

Saturday, March 29, 2014
5 best tips for writing good keywords to optimize for SEO
Content is the KING for SEO and keywords play an essential part of SEO. Keywords are nothing but the search terms that people use on various search engines to search the topics related to those keywords. We often spend too much time for optimizing our blog post for search engine. Using effective keywords is a successful part of blog optimization. Search engine crawlers crawl your content and keywords from your blog posts and they tells the search engine about your posts on your blogs. We commonly speak about search engine ranking and this ranking depends upon the content you use in your posts. To get good ranking on search engines, first you need to know How to build good content for search engines?Here is a clear explanation for SEO below. Read every line without missing anything.
Choose Your Keywords :
When content is the "KING" let's say keywords as "QUEEN". Yes, that's true. As every SEO analyst says that content is the KING of SEO, now let's talk about the QUEEN :p sorry, keywords. Before writing any post you need to check for keywords using any keyword checker tool, and you have to choose strong keywords for your blog posts. I suggest you to use Google AdWords tool for keyword research. You have to look for the competition between those keywords and shortlist some of them. Here you need to select the keywords with less competition because they help you in getting good page rank in search results.Use Keywords In Your Post Title :
I have already discussed about SEO Title Tag Best Practices.After deciding the keywords for your blog, the next step is to use those keywords in your blog posts efficiently to make the most out of them. Start with the post title, use your keyword or keyword phrases in your post’s title. Remember post titles stays first to be crawled by search engines, hence use keyword or keyword phrases in your post titles so that they will tell the search engines what exactly the post is about.
You must read these posts also.
SEO Title Tag Best Practices
8 Tips to reduce load time of Blog/Website
5 Idiotic ways you can promote your blog
Improve Traffic by facebook fan page
Optimize your blog post titles for SEO
6 ways to optimize your website/blog for search engines
Use Keywords In Headings And Sub-Headings:
Headings and sub-headings play an important role for SEO. Don't neglect headings in your posts. Write headings in your posts whenever it is necessary. For example when we read something on a newspaper or a website we are mostly satisfied to read the content that is separated by paragraphs with neat sub headings between. We prefer reading the text with sub headings and small paragraphs rather than long paragraphs. Similarly the search engines also look for the same. Don't you think of writing an article with headings and sub headings so that they could attract search engines? Yes, that would be great. So we need to write great content with strong keywords making use of headings. This can be done by <h2> and <h3> tags for headings and sub headings. Don't forget to use keywords within these tags because it will add more benefits to attract search engines.Use Keywords In Anchor Tag:
We know that anchor tags are used for links. But it is also much good to know that anchor tags will help you for SEO. Try using your keywords within the anchor tags. Search engines mostly prefer anchor tags than simple text. Hence try using your keywords with anchor tags to improve your blog ranking for search engines.Use Keywords In ALT Tag:
Try using images with alt tags. Search engines don't have the capability of reading an image but it can read alt tags. So to describe the intention of an image we can use alt tags with keywords. Labels: blogger tips, SEOHow to get website domains at cheaper rates?
Today every business needs a website to grow in this competitive world. So most of the businesses are getting online with websites. Not only for businesses but also to earn money online bloggers are establishing blogs and running them by writing content that is useful for the readers. I have seen most of them are searching for money earning methods online without any investment and mostly students want to start blogging. If you are a student looking to start a blog at less cost then this trick will help you very much.You can read more about online money earning methods and blogging
What is a blog?
How to earn money online?
Can I earn from blog?
How Can Students Earn More Money?
Why every freelance worker wants to be a blogger?
5 Idiotic ways you can promote your blog
8 Tips to reduce load time of Blog/Website
Make your own Blank Template for Blogger
The simple way to get a domain at cheaper rates is just go to google and search for cheap domains. You will see the results something like the below image. Just click on the links which are displayed in the top that have offers as shown in the marked part of the below screenshot.
Thank you. I hope this post might have helped you a lot in choosing a plan to avail domains at cheaper rates. Please share your opinions in the comments below. Labels: Domains, Hosting, internet tips, Tips and Tricks, Web Development
Friday, March 28, 2014
How to display preview of image before upload using JQuery
 When our application needs to have an option for image uploads we use input tag in a form. The upload process is handled inside a PHP file which we can discuss in future. We have already discussed about hiding an image which is broken. File uploading is very easy but sometimes we even want to preview the image before it is uploaded.
 For this purpose we can use JQuery code which will show the image before it is uploaded. Today I am going to discuss about the code which helps you preview the image before upload.
Here is the code for showing image before uploading.
JQuery:
$(document).ready(function(){
$("#image").change(function(){
var file = document.getElementById("image").files[0];
var readImg = new FileReader();
readImg.readAsDataURL(file);
readImg.onload = function(e) {
$('.imagepreview').attr('src',e.target.result).fadeIn();
}
})
})
This code uses the advantage of HTML5 attribute. FileReader reads the file, here the file is an image. It fetches the URL of the current image to show up when it is selected through file browser field.
The above code jquery code fetches the image and shows the preview. Below is the HTML code which refers the above jquery code.
HTML:
<input name="image" type="file" class="image" id="image"><br/>
<img class="imagepreview" src="">
Since the above HTML code has no image in the source it displays a broken image, so in order to eliminate the broken image we can use the code for this link to avoid broken images or we can use the following CSS code instead of the code specified in the link. I recommend you to use the CSS code below.
CSS:
.imagepreview{width:500px;
display:none;}
Here are some helpful posts for bloggers and web designers.
Add Google Plus Follower Gadget For Blogger
How to add floating widget to blogger blog
Add awesome sticky footer menu to Blogger with simple HTML
How to trace details of an unknown person with mobile number
Why every freelance worker wants to be a blogger?
Which is the best way to optimize mobile site?
How facebook fan page can make you money?
Separate Contact page in Blogger
How to add Contact Form Widget to blogger Official Plugin
SEO Title Tag Best Practices
How to disable graph search on facebook/trick to remove facebook graph
How to find fake profile pictures on facebook?
Add Facebook Like Button below posts titles (Speed Loading)
How to delete Facebook account permanently?
How to use facebook on slow internet connections
How to delete Google Search History/Cache?
8 Tips to reduce load time of Blog/Website
Xenon Blogger Template Download
3 ways to make money online
5 Idiotic ways you can promote your blog
I have given you three blocks of code for image preview. Look below for the complete code after combining all the above blocks of code.
<html>
<head>
<meta http-equiv="Content-Type" content="text/html; charset=utf-8">
<title>Preview image before upload by TricksTown.com</title>
<script src="http://code.jquery.com/jquery-1.10.1.min.js"></script>
<script>
$(document).ready(function(){
$("#image").change(function(){
var file = document.getElementById("image").files[0];
var readImg = new FileReader();
readImg.readAsDataURL(file);
readImg.onload = function(e) {
$('.imagepreview').attr('src',e.target.result).fadeIn();
}
})
})
</script>
<style>
.imagepreview{width:500px;
display:none;}
</style>
</head>
<body>
<input name="image" type="file" class="image" id="image"><br/>
<img class="imagepreview" src="">
</body>
</html>
Copy the above code and paste it in your notepad. Save it with .html extension and check it.
Enjoy... :) Happy coding.
Thank you. If you have any doubts, please comment below. Spam comments will be removed. Labels: HTML5, JQuery, Web Design, Web Development
Thursday, March 27, 2014
How to hide or fix a broken image using jquery

You may like these
Get free likes for your facebook account.
Login script in PHP
Delete file using PHP
Delete Facebook account permanently
Disable graph search on Facebook
Pagination with PHP
Awesome stylish sliding professional contact form for your website
Use facebook on slow internet
How to delete google cache from search
How to scare your friends with simple code
Just look at the code below.
<script>
$(document).ready(function(){
$("img").error(function(){
$(this).hide();
});
})
</script>
Copy the above code and paste it above the closing </head> tag. That's it. You are done. is
Explanation:
$(document).ready(function()) says the function to execute when the page loads.$("img") finds the img tag.
error(function()) checks if the img tag has any error and executes the function to hide the broken image using $(this).hide();
Here this refers to the current one i.e., the img tag.
Thanks for reading this article. If you have any doubts please don't hesitate to comment below. Labels: blogger tips, JQuery, Web Design, Web Development
Friday, March 21, 2014
3 ways to make money online

Be careful with these schemes.
Most of these schemes are fake.Just think about these questions before you apply for those schemes.
How can you get money without doing any work?
Why most of these Scheme owners ask you to pay some amount?
Is that scheme legal?
Does the company really exist?
After thinking all these points in your mind, let make sure that it is true. If you are sure then go ahead.What actually people think after reading AD's about these schemes?
This is the good idea to make money quicker.
I have came to the right point now, I will to become rich soon.
My dream is going to be true now.
Making money is everybody's dream. But think twice and act wise.
I'm not saying that all these schemes are fake. There are few legitimate schemes that offer you making money online.3 ways you can make money online without all these schemes.
As we discussed above that there are fake scheme that fails you to get a good online money earning opportunity. You can earn money online in your own ways legally.Start a unique website:
Today we have many services that are running online. We cannot figure out a business/service that is out of the web world. But if you think creatively you can get new ideas to start a unique website. Think differently and start a website with which you can start your own business online. You can earn through your websites if it is useful to the people. To be a successful person in making money through your website, first find out what people are looking for and how much you can struggle in helping them by offering your services through your website.
Start blogging to earn:
Blogging is great career for those who can spend their time on writing articles. Even a student can start a blog if he/she has great writing skills. Blogging is the best way to earn money online without any investment of money if you create your blog on a free platform like blogger. There are many ways to earn through blogs. But however you might have a question raising in your mind "Can I earn money from blogs?" Then read this article Can Blogging make money/Can I earn from blog?.Even though blogging is one of the best platforms to earn handsome money and fame online, it is never so easy if you don't have a perfect planning to maintain your blog. If you are an expert in writing articles and want to start your blog soon then this is the right time to start it. Read this article to know why? Start Blogging in 2013 to Earn Money.
Affiliate Marketing:
The other way to earn money online is by Affiliate marketing. Many people who work online are mostly working with affiliate marketing. The term Affiliate Marketing means selling third party goods or services.To start your affiliate business read Top 5 Affiliate Networks to Earn Money.
Thanks for reading this article.
If you have any doubts or any ideas to share then please comment below.
Share this article with your friends so that it will help them to get rid of Fake Schemes that say Earn money online.
Labels: blogging, Money Earning Tips, online jobs free, Work from homeFriday, March 7, 2014
PHP simple login script
 Hi dear friends, we have discussed about deleting a file using PHP script in our previous tutorial. In this tutorial I am going to explain you about login script using PHP. Login is used in applications where a user needs to be authenticated to access an application. This tutorial will give you the basic login form. I have used MySql to connect to the database where the login details are stored.
I have three PHP files where the first file contains the login form, the second contains the process for login form and the third file is the one where you will be redirected after login is successful.
Now let us see these files and let me explain them in detail. Please follow these carefully.
login.php
As I said there are three files. Login.php is the first file that contains login form. Let us see the code for it.login.php
In the above code we have HTML form which is used to fill the email and password. It contains input fields of text and submit button. In the <form> tag you can see action. It tells the form to perform an action. We have to supply a file name on which the action has to be performed.<!DOCTYPE html PUBLIC "-//W3C//DTD XHTML 1.0 Transitional//EN" "http://www.w3.org/TR/xhtml1/DTD/xhtml1-transitional.dtd">
<html xmlns="http://www.w3.org/1999/xhtml" lang="te-IN">
<head>
<meta http-equiv="Content-Type" content="text/html; charset=UTF-8" />
<title>Login</title>
</head>
<body>
<?php if(@$_REQUEST['msg']=='fail')
{
echo"<div style='color:red;'>User name or password invalid.</div>";
}
?>
<style>
.login_field
{
border:2px solid rgb(168, 168, 168);
border-radius:8px;
box-shadow:1px 0px 9px rgb(110, 110, 110);
color:rgb(153, 153, 153);
font-size:14px;
height:20px;
padding:4px;
}
</style>
<h1>Login</h1>
<form action="login_a.php" method="post" style="clear:both;">
<table>
<tr><td>Email</td><td><input type="text" name="email" id="email" class="login_field"></td>
</tr></br>
<tr><td>Password</td><td><input type="password" name="pwd" id="pwd" class="login_field"></td>
</tr></br>
<tr>
<td><input type="submit" name="login" value="login" onClick="return validate()"></td>
</tr>
</table>
</form>
</body>
</html>
Next you can see method It tells the form whether to POST or GET. There are three form methods POST, GET and REQUEST. Method will send the form values to the file which performs an action.
Name attributes inside input tags are used to get the values in the text boxes.
$_REQUEST['msg']=='fail' checks whether the get method has the value fail for msg and if it is true then it prints "User name or password invalid". The request method will be executed when the username or password is wrong.
Copy the above code and save it as login.php
Now lets have a look on the second file which performs the action for login.
login_a.php
<?phpThe above code session_start(); is a function that starts a session for the login.
session_start();
include "db.php";
if(isset($_REQUEST['login']))
{
$email = $_POST['email'];
$password = $_POST['pwd'];
$check = mysql_query("select * from user where email='$email' and password= BINARY '$password'")or die(mysql_error());
$ret = mysql_fetch_array($check);
$count = mysql_num_rows($check);
if($count==1)
{
$_SESSION['id']=$ret['id'];
header('location:index.php');
exit();
}
else
{
header('location:login.php?msg=fail');
exit();
}
}
?>
include "db.php"; will import the database file. For database connection file please read How to connect mysql database using PHP, copy the code from there and save it as db.php
isset($_REQUEST['login']) checks whether the form has the name login in the submit button. If yes it will fetch the values from the text boxes of the form.
$check = mysql_query("select * from user where email='$email' and password= BINARY '$password'")or die(mysql_error()); //checks the email and password whether matching or not. and die(mysql_error()) returns a value if it finds any error in the syntax.
$ret = mysql_fetch_array($check); This line fetches the array from the database.
Here is the logic $count = mysql_num_rows($check); counts for the number of rows in the database matching for the current email and password.
We have unique email or usernames for login. So if($count==1) checks whether the count is equals to 1.
If yes then it creates a session and redirects you to the next page else you will be taken back to the login page with an error message we discussed above.
Copy and save the second block of code as login_a.php
The next and last page after login is index.php
index.php
<?phpAs discussed above session_start(); starts a session for this page.
session_start();
$id = $_SESSION['id'];
if(empty($_SESSION['id']))
{
header('location:login.php');
exit;
}
?>
<!DOCTYPE html PUBLIC "-//W3C//DTD XHTML 1.0 Transitional//EN" "http://www.w3.org/TR/xhtml1/DTD/xhtml1-transitional.dtd">
<html xmlns="http://www.w3.org/1999/xhtml">
<head>
<meta http-equiv="Content-Type" content="text/html; charset=utf-8" />
<title>Home</title>
<link href="css/gallery.css" rel="stylesheet" type="text/css" />
<link rel="stylesheet" type="text/css" href="css/style.css" />
</head>
Welcome
</body>
</html>
$id = $_SESSION['id']; // session stores id in it.
if(empty($_SESSION['id'])) checks if session expired. If yes the page will be redirected to login.php
Save this code as index.php
The sql for the login script is given below.
CREATE TABLE IF NOT EXISTS `user` (
`id` int(5) NOT NULL AUTO_INCREMENT,
`name` varchar(30) NOT NULL,
`email` varchar(30) NOT NULL,
`password` varchar(15) NOT NULL,
PRIMARY KEY (`id`)
) ENGINE=InnoDB DEFAULT CHARSET=latin1
AUTO_INCREMENT=2 ;
--
-- Dumping data for table `user`
--
INSERT INTO
`user` (`id`, `name`, `email`, `password`) VALUES
(1, '', 'admin@admin.com',
'pass');
Run the sql query in phpmyadmin and set the requires database configuration by copying the db.php from here and login to the application using admin@admin.com as email and pass as password.
Thank you very much. Please feel free to ask your queries below.
Note: Spamming comments will be removed.
Labels: MySQL, PHP
Friday, February 21, 2014
How to delete a file using PHP

When I was working with a project with file uploads, I had a thought of deleting those files with php. unlink is used to delete a file from a folder. It takes the file path along with the file name as parameter. This funtion can be simply written as shown below.
unlink("path_to_img/file_name.extension");For example if you want to delete a text file sample.txt which inside the folder uploads then you need to use like this unlink("uploads/sample.txt);
You can use the same code to delete any file, just by changing the file extension.
Thank you very much. If you have any doubts just comment below. I'm always happy to help you.
Tags:
How to delete a file using PHP? How to delete a file from a folder using PHP? php code to delete a file
php code to unlink a file. from folder remove file using php .
remove files from folder using php
php script to remove files
php script to delet files
how can i remove file using php
how can i delete a file using php
php delete file
php file delete
php files delete using code
php deletion of a file
file deletion using php
delete an image using php
delete a photo using php
delete photo images with php
php code to delete photos
php photo deleting code
php function to delete photo
php function to remove images
php function to remove images photos and files
How to delete a file using php
how to delete an image from folder using php
how can i delete photo usnig php
Labels: PHP, Web Development
How to connect mysql database using PHP
We have seen how to fetch youtube videos using simple javascript in our previous tutorial. Today's tutorial is about connecting our database using PHP. Since PHP is a dynamic scripting language and it uses mysql database in the back end to store the data. That means the php file has to be configured to connect the database. This can be done very easily with a simple php code. This tutorial will help you to connect to the database. The database connection needs four parameters to be passed into two functions. mysql_connect() and mysql_select_db() are the two functions to connect to the database.mysql_connect() function requires three parameters and this function is used to connect to the database. and mysql_select_db() function is used to select the database.
Here is the simple code that you can simply copy and use to connect your database with php.
<?phpNow replace root with your database username database_password with your database password database_name with your database username. That's it, you are done.
$dbhost = "localhost"; //host name (usually localhost)
$dbuser = "root"; //your database(mysql) user name
$dbpass = "database_password"; //your database (mysql) password
$dbname = "database_name"; //database name
$conn = mysql_connect($dbhost, $dbuser, $dbpass) or die ("Error connecting to database");
mysql_select_db($dbname) or die ("Error selecting the database");
?>
Please don't hesitate to ask your queries. Thank you Labels: MySQL, PHP
Thursday, February 13, 2014
How to fetch youtube video thumbnail title using javascript

Hi friends, we have discussed about pagination tutorial using PHP and MySql in previous post. In this tutorial I came up with a script to fetch youtube videos on the client side using javascript. Sometimes we need to put video thumbnail and it's title to show as gallery. I worried about fetching videos into my website first. I googled for the code and found youtube API code. Using youtube API we can retrieve upto 50 videos. Youtube API code fetches last 50 videos uploaded by the user through feeds.
Now let me explain you about the javascript code to fetch youtube videos. It contains a small code that fetches the video thumbnails directly from youtube into your site. You just need to put video id into the code. Here in this tutorial I have included CSS styles to give a style to the video thumbnails.
Javascript code with HTML:
<div id="vidC">
<div id="vidThumb">
<script type="text/javascript">
//function to call youtube feeds
function youtubeFeedCallback(data) {
var s = '';
s += '<img src="http://i1.ytimg.com/vi/YOUTUBE-VIDEO-ID/mqdefault.jpg"/>'; //fetching the thumbnail image of the video
s += '<p style="color:white; font-size:13px;"> ' + data.entry.title.$t + '</p>'; //here we get the title of the video
document.write(s);//writes the above values in HTML
}
</script>
<!--youtube feeds API-->
<script type="text/javascript" src="http://gdata.youtube.com/feeds/api/videos/YOUTUBE-VIDEO-ID?v=2&alt=json-in-script&callback=youtubeFeedCallback"></script>
</div>
Copy the above code and replace YOUTUBE-VIDEO-ID with the video ID from youtube.
Ex:
<script type="text/javascript">
//function to call youtube feeds
function youtubeFeedCallback(data) {
var s = '';
s += '<img src="http://i1.ytimg.com/vi/mhzyi9nDHFI/mqdefault.jpg"/>'; //fetching the thumbnail image of the video
s += '<p style="color:white; font-size:13px;"> ' + data.entry.title.$t + '</p>'; //here we get the title of the video
document.write(s);//writes the above values in HTML
}
</script>
<!--youtube feeds API-->
<script type="text/javascript" src="http://gdata.youtube.com/feeds/api/videos/mhzyi9nDHFI?v=2&alt=json-in-script&callback=youtubeFeedCallback"></script>
If you want to include styles then just copy the below CSS code.
<style>Put these both blocks of code in a file and save it in HTML. Now the code will fetch the youtube thumbnails along with their titles.
#vidC {
width: 282px;
height: 190px;
padding: 5px;
margin-right: 15px;
background-color: #000000;
box-shadow:2px 0px 10px #333333;
margin-bottom: 20px;
float: left;
}
#vidThumb img{
width: 282px;
height: 158px;
padding: 0;
border:none;
}
</style>
Thank you. Please comment below if you need any help regarding this tutorial.
Labels: Javascript, Tips and Tricks, Web Development, Youtube
Wednesday, February 12, 2014
Create simple pagination with PHP and MySQL

Hi friends, todays tutorial is about creating a simple pagination using PHP and MySQL. I am going to explain you about creating a page with PREVIOUS and NEXT links at the bottom of your page with numberings.
Before looking at the code let's discuss about pagination concept. Pagination let's you create links that contains the data which is the continuation of the current item. Whenever there is large amount of data then it looks hard to load the entire data into a single page. Hence, we use the concept of pagination to allow the content to be split into parts and show only some part of the content per each page. This will give your website viewers a great experience and also has an advantage of speed loading of data, inorder to avoid the inconvenience.
You may also like:
Beautiful contact form for websites
Add Google plus follower widget to blogger
Stylish sticky menu bar with social icons for footer
Make money with facebook
Add contact form to your blogger blog free
Get more visitors to your site with SEO
Remove facebook graph search
Trick to find fake accounts on facebook
Get free mobile balance 100% working trick in India only
Speed loading like button for blogger
Delete facebook account permanently 100% working trick
Trick to use facebook on slow internet
How to get more page likes on facebook
How to delete google search history
8 Tricks to reduce load time of your website
3 ways to make money online without investment
5 idiotic ways to promote your blog
I said before that this code is based on PHP and MySQL, hence this code reads the data from the database tables and displays it on our page with pagination links. Since the data is being retrieved from the tables in the database we need to use sql connection mysql_connect() and then we need select database using mysql_select_db(). Let us see briefly how to connect to database using these two functions in PHP.
Code for Database connection:
<?phpThe above code is used for datavase connection. Now let's see the code that is required to generate pagination links.
$dbhostname = "host name here"; //replace with your host name usually localhostname
$dbusername = "database user name"; //replace with your database user name.
$dbpassword = "database password"; //replace with your password
$dbname = "database name"; //replace with your database name
$conn = mysql_connect($dbhostname, $dbusername, $dbpassword) or die ("Database connection failed");
mysql_select_db($dbname) or die ("Database selection failed");
?>
Code to generate pagination:
<?phpThe above part of the code is to generate pagination links. I have clearly explained within the comments. So please look the code carefully and understand it. The above code is not included with database connection. Hence we can combine both the above codes together as shown below.
function create_pagination($current_page, $total_pages)
{
$create_page_links = '';
// generates anchor tag for previous page if this is not first page
if ($current_page > 1)
{
$create_page_links .= '<a href="current-page-name.php?page=' . ($current_page - 1) . '">PREV</a> ';
}
// generates page links with numbers till the loop ends
for ($count = 1; $count <= $total_pages; $count++)
{
if ($current_page == $count)
{
$create_page_links .= ' ' . $count;
}
else
{
$create_page_links .= ' <a href="' . $_SERVER['PHP_SELF'] . '?page=' . $count . '"> ' . $count . '</a>';
}
}
// generates anchor tag link for next page if this is not last page
if ($current_page < $total_pages) {
$create_page_links .= ' <a href="' . $_SERVER['PHP_SELF'] . '?page=' . ($current_page + 1) . '">NEXT</a>';
}
return $create_page_links;
}
// Calculate pagination
$current_page = isset($_GET['page']) ? $_GET['page'] : 1;
$results_per_page =15; // displays number of results per single page replace 15 with number of pages you may want
$jump = (($current_page - 1) * $results_per_page); //3*2
$query = "select * FROM table_name order by id desc";//query to select from table
$result = mysql_query($query1);
$total = mysql_num_rows($result); //counts number of rows
$total_pages = ceil($total / $results_per_page);
$query = $query . " LIMIT $jump, $results_per_page";
$result = mysql_query($query);
while($row = mysql_fetch_array($result))
{
//your code here to retrieve rows
}
?>
<!--creates links to display at bottom with previous, next and page numbers-->
<div style="float:left; padding:20px">
<?php
if ($total_pages > 1)
{
echo create_pagination($current_page, $total_pages);
}
?>
</div>
Pagination code with database connection:
The above code is the final one.Copy the code and use it wherever you want.<?php$dbhostname = "host name here"; //replace with your host name usually localhostname
$dbusername = "database user name"; //replace with your database user name.
$dbpassword = "database password"; //replace with your password
$dbname = "database name"; //replace with your database name
$conn = mysql_connect($dbhostname, $dbusername, $dbpassword) or die ("Database connection failed");
mysql_select_db($dbname) or die ("Database selection failed");
function create_pagination($current_page, $total_pages)
{
$create_page_links = '';
// generates anchor tag for previous page if this is not first page
if ($current_page > 1)
{
$create_page_links .= '<a href="current-page-name.php?page=' . ($current_page - 1) . '">PREV</a> ';
}
// generates page links with numbers till the loop ends
for ($count = 1; $count <= $total_pages; $count++)
{
if ($current_page == $count)
{
$create_page_links .= ' ' . $count;
}
else
{
$create_page_links .= ' <a href="' . $_SERVER['PHP_SELF'] . '?page=' . $count . '"> ' . $count . '</a>';
}
}
// generates anchor tag link for next page if this is not last page
if ($current_page < $total_pages) {
$create_page_links .= ' <a href="' . $_SERVER['PHP_SELF'] . '?page=' . ($current_page + 1) . '">NEXT</a>';
}
return $create_page_links;
}
// Calculate pagination
$current_page = isset($_GET['page']) ? $_GET['page'] : 1;
$results_per_page =15; // displays number of results per single page replace 15 with number of pages you may want
$jump = (($current_page - 1) * $results_per_page); //3*2
$query = "select * FROM table_name order by id desc";//query to select from table
$result = mysql_query($query1);
$total = mysql_num_rows($result); //counts number of rows
$total_pages = ceil($total / $results_per_page);
$query = $query . " LIMIT $jump, $results_per_page";
$result = mysql_query($query);
while($row = mysql_fetch_array($result))
{
//your code here to retrieve rows}
?>
<!--creates links to display at bottom with previous, next and page numbers-->
<div style="float:left; padding:20px">
<?php
if ($total_pages > 1)
{
echo create_pagination($current_page, $total_pages);
}
?>
</div>
Note: Now just make these changes before using the code.
host name here //replace with your host name usually localhostname
database user name //replace with your database user name.
database password//replace with your password
database name //replace with your database name
current-page-name.php //Replace with the name of the page where this code is being used.
$results_per_page =15 //change 15 to whatever the number results you may want to display ina single page
//your code here to retrieve rows //Code to fetch the rows from a database table
Thanks for reading this articles.
If you still have any queries then please don't hesitate to comment below. Labels: MySQL, PHP, Web Design, Web Development
Sunday, February 2, 2014
CSS3 Stylish Contact Form with JQuery toggle and PHP
 Hi friends, we have discussed about creating a beautiful contact form before. We also discussed about the importance of a contact form. You must know why a contact form is important. If you are running a business and you own a website for your business then your customers can easily contact you through your website. This will let you get new customers through your business website. There are many chances of losing customers from you if you are not available to your customers. The chance of losing customers can be avoided with a simple contact form. This form is an advanced version of the previous contact form and is having stylish look. You need to think about the UI design of your contact form. Because the great looks of your form can impress your customers much more than the old looks. This form has a JQuery toggle slide down and has designed with CSS3 to add awesome looks to the form.
You may also like:
Beautiful contact form for websites
Add Google plus follower widget to blogger
Stylish sticky menu bar with social icons for footer
Make money with facebook
Add contact form to your blogger blog free
Get more visitors to your site with SEO
Remove facebook graph search
 Trick to find fake accounts on facebook
Get free mobile balance 100% working trick in India only
Speed loading like button for blogger
Delete facebook account permanently 100% working trick
Trick to use facebook on slow internet
How to get more page likes on facebook
How to delete google search history
8 Tricks to reduce load time of your website
3 ways to make money online without investment
5 idiotic ways to promote your blog
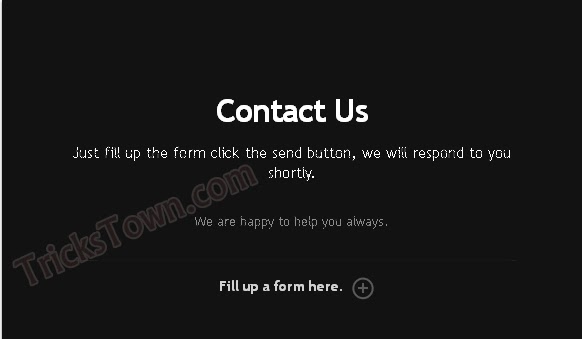
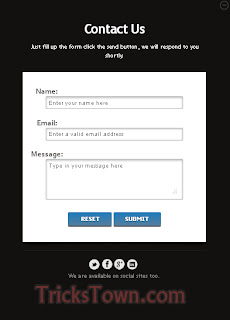
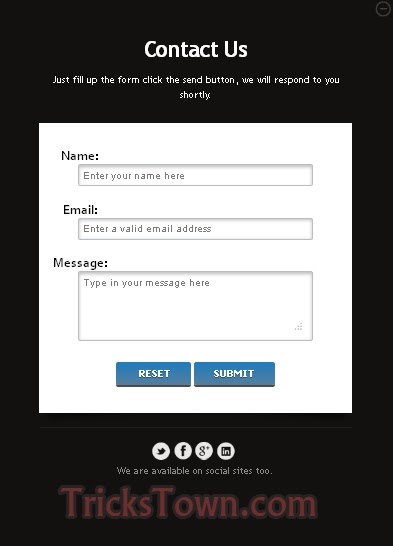
The form looks as shown in the first image and when you click on the plus button it will slide down and with a form. This leaves much more impression on your business. The messages sent through the form are received directly into your mail.View Demo
Now let's see the code that is needed for creating this stylish contact form.
First let us look at the HTML code to make a form.
<form action="send-mail.php" method="post">The above code is a simple HTML form with name, email and message fields and two buttons to reset the form and the other is to submit the form. I have shown you just a form in HTML. Just see that to learn how to create a form if you are new to HTML.
<div id="custom-form-inner">
<label for="name">Name:</label>
<input type="text" class="field" id="name" name="name" placeholder="Enter your name here">
<label for="email">Email:</label>
<input type="email" class="field" id="email" name="email" placeholder="Enter a valid email address">
<label for="message">Message:</label>
<textarea class="field textarea" id="message" name="msg" placeholder="Type in your message here"></textarea>
<br />
<input type="reset" class="btn" value=" Reset">
<input type="submit" name="send" class="btn" value="Submit">
</div>
</form>
Now I want to give you the actual HTML code required to create stylish contact form.
HTML code:
<div class="trickstown">Now that you have seen the HTML code for this stylish contact form and in the next step I'll show you the CSS required to apply styles to the form.
<span class="close">Close</span>
<div id="trickstown-contact-outer">
<div style=" border-bottom:1px solid #1d1d1d;" id="bioinfo">
<h1>Contact Us</h1><br/>
<h2>Just fill up the form click the send button, we will respond to you shortly.</h2>
<p id="my-tt-message" style="display: block; text-align: center;height: 18px; margin-bottom: 30px; margin-top: 20px;">We are happy to help you always.</p>
<div id="image">
<div id="trickstown-contact-wrap">
<form action="send-mail.php" method="post">
<div id="custom-form-inner">
<label for="name">Name:</label>
<input type="text" class="field" id="name" name="name" placeholder="Enter your name here">
<label for="email">Email:</label>
<input type="email" class="field" id="email" name="email" placeholder="Enter a valid email address">
<label for="message">Message:</label>
<textarea class="field textarea" id="message" name="msg" placeholder="Type in your message here"></textarea>
<br />
<input type="reset" class="btn" value=" Reset">
<input type="submit" name="send" class="btn" value="Submit">
</div>
</form>
</div>
</div>
</div>
<p class="fill-form" style="display: block; "><span>Fill up a form here.</span></p>
<ul id="trickstown-social-icons">
<li><a class="twitter" target="_blank" href="http://www.twitter.com/user-name" title="@trickstown on Twitter">Twitter</a></li>
<li><a class="facebook" target="_blank" href="http://www.facebook.com/user-name" title="Facebook Profile">Facebook</a></li>
<li><a class="google-plus" target="_blank" href="https://plus.google.com/+user-name/" title="Google+ Profile">Google+</a></li>
<li><a class="linkedin" target="_blank" href="http://in.linkedin.com/in/user-name" title="Linkedin Profile">LinkedIn</a></li>
</ul>
<p id="trickstown-info" style="font-size: 14px;line-height: 22px;">We are available on social sites too.</p>
</div>
</div>
CSS Code:
<style>The above code is to apply styles to the contact form. This is a CSS3 code to bring you out the awesome look for a contact form.
.trickstown{
background-color:#111111;
margin:0 auto;
margin-top:200px;
width:560px;
padding:10px;
height:320px;
-webkit-box-shadow: 0 1px 2px #666;
box-shadow: 0 1px 2px #666;
}
#trickstown-contact-outer{
font-family:"Trebuchet MS", Arial, Helvetica, sans-serif;
text-align:center;
width:450px;
margin:0 auto;
margin-top:80px;
}
#bioinfo{background-color:#111111;
position:relative;
z-index:999;
}
#trickstown-contact-outer h1{color:#FFF;
font-family:"Trebuchet MS", Arial, Helvetica, sans-serif;
font-size:32px;
font-weight:700px;
margin:0;
padding:0;
letter-spacing:-1px;
}
#trickstown-contact-outer h2{ color:#FFF;
margin:0;
padding:0;
font-weight:100;
font-size:15px;
font-family:"Trebuchet MS", Arial, Helvetica, sans-serif;
margin-top:-10px;
margin-bottom:30px;
}
#my-tt-message{font-size: 13px;
line-height: 18px;
width: 375px;
display: block;
margin: 20px auto 30px;
color:#888888
}
.fill-form{font-size: 14px;
font-weight: 700;
color: #fff;
display: inline-block;
text-decoration: none;
line-height: 22px;
cursor: pointer;
margin-right: 10px;
}
#trickstown-contact-outer p {
color: #888888;
}
#trickstown-contact-outer .fill-form span {font-size: 14px;
font-weight: 700;
color: #fff;d
isplay: inline-block;
text-decoration: none;
line-height: 22px;
position: relative;
opacity: .8;
filter: alpha(opacity=80);
cursor: pointer;
margin-right: 10px;
margin-top:20px;}
#trickstown-contact-outer .fill-form span:after {content:url(https://blogger.googleusercontent.com/img/b/R29vZ2xl/AVvXsEjz-hFoiGnOZ-ZF-rRy1EzQvYs3irhpWYPyo_i0WN4XjBEOuPCnIBUBOiQMFHm6f37UP1-_fJj_g9CZBN5ZpIoau88zrGUKXR9J_EoEGd_hQk6hoaQSovdCeUCL-eGv3ULse0t5xxF01w/s1600/read-more-plus.png);
position: absolute;
top: 0;
right: -30px;
opacity: .4;
filter: alpha(opacity=40);
}
#trickstown-contact-outer .fill-form span:hover {
border-bottom: 1px solid #fe544a;}
#trickstown-contact-outer .fill-form span:hover:after{opacity:1;
filter:alpha(opacity=100)}
.close {cursor: pointer;
width: 23px;
height: 23px;
background: url(https://blogger.googleusercontent.com/img/b/R29vZ2xl/AVvXsEhQ8H-WlCLYHX6GHmo5DDUNkexhrJHv2KhLkoMQ7GoMnDyrnwg4OER29A3Y_oFnZLnpx3t8ElaFNM7cF4h5lixX0ykAe1pv-loBakvoPU7Uf9caI4G3VL5VZmwlk2ky5XumPXIdREGSiQ/s1600/profile-close.png) no-repeat;
opacity: .2;
filter: alpha(opacity=20);
text-indent: -9999px;
float:right;d
isplay:none;
}
.close:hover{opacity:1;
filter:alpha(opacity=100)}
#image{ display:none;
position:relative;}
#trickstown-social-icons {
position: relative;
top: -97px;
list-style: none;
margin: 0 auto 50px;
padding: 0;
width: 125px;
text-align: center;}
#trickstown-social-icons li a {
background: url(https://blogger.googleusercontent.com/img/b/R29vZ2xl/AVvXsEigR6CQ9AENc6jsyjgQfNEIdmRr30U6k3gVHJi2WokvgLmw1_kP982nL3OrY5JpJ0N5DT_4G45YawsK8_3Zupm4HXdQbafSex7ZI5qA125yZ7Ft9A2FCVRHwdcvPXt4gVb6_cuU4U6fmA/s1600/social-icons.png) no-repeat;
text-indent: -9999px;
margin: 0 5px 5px 0;
width: 26px;
height: 26px;
opacity: .9;
filter: alpha(opacity=90);
float:left;
}
#trickstown-social-icons .twitter {
background-position: -54px -80px;
}
#trickstown-social-icons .facebook {
background-position: -27px 0;
}
#trickstown-social-icons .google-plus {
background-position: -54px -26px;
}
#trickstown-social-icons .linkedin {
background-position: -54px -53px;
}
#trickstown-info{display:none;}
#trickstown-contact-wrap:before, #trickstown-contact-wrap:after {
z-index: -1;
position: absolute;
content: "";
bottom: 15px;
left: 10px;
width: 50%;
top: 80%;
max-width:300px;
background: rgba(0, 0, 0, 0.7);
-webkit-box-shadow: 0 15px 10px rgba(0,0,0, 0.7);
-moz-box-shadow: 0 15px 10px rgba(0, 0, 0, 0.7);
box-shadow: 0 15px 10px rgba(0, 0, 0, 0.7);
-webkit-transform: rotate(-3deg);
-moz-transform: rotate(-3deg);
-o-transform: rotate(-3deg);
-ms-transform: rotate(-3deg);
transform: rotate(-3deg);
}
#trickstown-contact-wrap:after {
-webkit-transform: rotate(3deg);
-moz-transform: rotate(3deg);
-o-transform: rotate(3deg);
-ms-transform: rotate(3deg);
transform: rotate(3deg);
right: 10px;
left: auto;
}
#trickstown-contact-wrap .btn {
margin-top: 10px;
margin-left:auto;
margin-right:auto;
padding: 7px 25px;
cursor: pointer;
color: #fff;
font: bold 13px Tahoma, Verdana, Arial;
text-transform: uppercase;
overflow: visible; /* IE6/7 fix */
border: 0;
background-color: #557f9d;
background-image: -moz-linear-gradient(#227bb9, #557f9d);
background-image: -webkit-gradient(linear, left top, left bottom, from(#227bb9), to(#557f9d));
background-image: -webkit-linear-gradient(#227bb9, #557f9d);
background-image: -o-linear-gradient(#227bb9, #557f9d);
background-image: -ms-linear-gradient(#227bb9, #557f9d);
background-image: linear-gradient(#227bb9, #557f9d);
filter: progid:DXImageTransform.Microsoft.gradient(startColorStr='#227bb9', EndColorStr='#557f9d');
-moz-border-radius: 3px;
-webkit-border-radius: 3px;
border-radius: 3px;
text-shadow: 0 1px 0 rgba(0,0,0,.3);
-moz-box-shadow: 0 1px 0 rgba(255, 255, 255, 0.5), 0 3px 0 rgba(0, 0, 0, 0.7);
-webkit-box-shadow: 0 1px 0 rgba(255, 255, 255, 0.5), 0 3px 0 rgba(0, 0, 0, 0.7);
box-shadow: 0 1px 0 rgba(255, 255, 255, 0.5), 0 3px 0 rgba(0, 0, 0, 0.7);
}
#trickstown-contact-wrap .btn:hover {
background-color: #557f9d;
background-image: -moz-linear-gradient(#557f9d, #a5b8da);
background-image: -webkit-gradient(linear, left top, left bottom, from(#557f9d), to(#a5b8da));
background-image: -webkit-linear-gradient(#557f9d, #a5b8da);
background-image: -o-linear-gradient(#557f9d, #a5b8da);
background-image: -ms-linear-gradient(#557f9d, #a5b8da);
background-image: linear-gradient(#557f9d, #a5b8da);
filter: progid:DXImageTransform.Microsoft.gradient(startColorStr='#557f9d', EndColorStr='#a5b8da');
}
#trickstown-contact-wrap .btn:active {
background: #64799e;
position: relative;
top: 2px;
-moz-box-shadow: 0 0 3px rgba(0, 0, 0, 0.7) inset;
-webkit-box-shadow: 0 0 3px rgba(0, 0, 0, 0.7) inset;
box-shadow: 0 0 3px rgba(0, 0, 0, 0.7) inset;
}
#trickstown-contact-wrap form {
background: #fff;
height: auto;
min-height:400px;
}
#trickstown-contact-wrap #custom-form-inner {
margin: 0 auto;
padding-top: 35px;
padding-bottom: 40px;
margin-bottom:20px;
}
#trickstown-contact-wrap label {
font: bold 18px/25px Corbel, Arial, Helvetica;
text-shadow: 0 1px 0 #fff, 0 2px 0 #ccc;
float: left;
margin-right: 10px;
width: 120px;
}
#trickstown-contact-wrap .field {
font: 15px Arial, Helvetica;
padding: 5px;
margin: 0 0 20px 0;
border: 1px solid #b9bdc1;
width: 75%;
color: #797979;
-moz-box-shadow: 0 2px 4px #bbb inset;
-webkit-box-shadow: 0 2px 4px #bbb inset;
box-shadow: 0 2px 4px #bbb inset;
-moz-border-radius: 3px;
-webkit-border-radius: 3px;
border-radius: 3px;
}
#trickstown-contact-wrap .field:focus {
background-color: #F6F5F4;
border-color:rgb(12, 155, 126);
box-shadow:0 0 4px rgb(12, 155, 126);
-webkit-box-shadow:0 0 4px rgb(12, 155, 126);
-moz-box-shadow:0 0 4px rgb(12, 155, 126);
}
#trickstown-contact-wrap .textarea {
height:auto;
min-height:100px;
max-width:75%;
}
</style>
Now we have discussed about the HTML and CSS codes required for the form. Now we have to look at JQuery code to apply toggle slide effect to the contact form.
JQuery Code:
<script src="http://code.jquery.com/jquery-1.10.1.min.js"></script>The above code is the required JQuery code to give you the best slide effects and toggle effects to your contact form.
<script>
$(document).ready(function(){
$('.fill-form').click(function(){
$(this).slideUp(300);
$('#my-tt-message').slideUp(300);
$('.trickstown').animate({height: "250px",marginTop: "250px"}, 500, function(){
$(this).delay(400).animate({height: "780px",marginTop: "80px",marginBottom: "80px"}, 500);
$('#bioinfo').delay(250).animate({marginTop: "-30px"}, 500);
$('.close').delay(50).fadeIn('slow');
$('#image').delay(1000).fadeIn('slow');
$('#trickstown-social-icons').delay(1000).slideDown('slow').animate({top: "20px"}, 500);
$('#trickstown-info').delay(1000).fadeIn(600);
});
});
$('.close').click(function(){
$(this).delay(100).fadeOut('slow');
$('#trickstown-social-icons').slideUp('slow').animate({top: "-97px"}, 500);
$('#bioinfo').delay(250).animate({marginTop: "0"}, 500);
$('#image').delay(100).fadeOut('slow');
$('#trickstown-info').hide();
$('.trickstown').delay(500).animate({height: "250px",marginTop: "250px"}, 500).delay(300).animate({height: "320px",marginTop: "200px"}, 500,function(){
$('.fill-form').slideDown(300);
$('#my-tt-message').slideDown(300);
});
});
});
</script>
Now let us put all the code together. The below code is the combination of all the above three. Copy the below code and save it as contact.html
contact.html
Copy the above code and paste it in any text editor such as notepad and save it as contact.html. Replace user-name to your user name of your social networks. Now your contact form is ready and you need to create one more page where the mail is sent to you. This page contains the configuration to send and receive mails through php.
<script src="http://code.jquery.com/jquery-1.10.1.min.js"></script>
<script>
$(document).ready(function(){
$('.fill-form').click(function(){
$(this).slideUp(300);
$('#my-tt-message').slideUp(300);
$('.trickstown').animate({height: "250px",marginTop: "250px"}, 500, function(){
$(this).delay(400).animate({height: "780px",marginTop: "80px",marginBottom: "80px"}, 500);
$('#bioinfo').delay(250).animate({marginTop: "-30px"}, 500);
$('.close').delay(50).fadeIn('slow');
$('#image').delay(1000).fadeIn('slow');
$('#trickstown-social-icons').delay(1000).slideDown('slow').animate({top: "20px"}, 500);
$('#trickstown-info').delay(1000).fadeIn(600);
});
});
$('.close').click(function(){
$(this).delay(100).fadeOut('slow');
$('#trickstown-social-icons').slideUp('slow').animate({top: "-97px"}, 500);
$('#bioinfo').delay(250).animate({marginTop: "0"}, 500);
$('#image').delay(100).fadeOut('slow');
$('#trickstown-info').hide();
$('.trickstown').delay(500).animate({height: "250px",marginTop: "250px"}, 500).delay(300).animate({height: "320px",marginTop: "200px"}, 500,function(){
$('.fill-form').slideDown(300);
$('#my-tt-message').slideDown(300);
});
});
});
</script>
<style>
.trickstown{
background-color:#111111;
margin:0 auto;
margin-top:200px;
width:560px;
padding:10px;
height:320px;
-webkit-box-shadow: 0 1px 2px #666;
box-shadow: 0 1px 2px #666;
}
#trickstown-contact-outer{
font-family:"Trebuchet MS", Arial, Helvetica, sans-serif;
text-align:center;
width:450px;
margin:0 auto;
margin-top:80px;
}
#bioinfo{background-color:#111111;
position:relative;
z-index:999;
}
#trickstown-contact-outer h1{color:#FFF;
font-family:"Trebuchet MS", Arial, Helvetica, sans-serif;
font-size:32px;
font-weight:700px;
margin:0;
padding:0;
letter-spacing:-1px;
}
#trickstown-contact-outer h2{ color:#FFF;
margin:0;
padding:0;
font-weight:100;
font-size:15px;
font-family:"Trebuchet MS", Arial, Helvetica, sans-serif;
margin-top:-10px;
margin-bottom:30px;
}
#my-tt-message{font-size: 13px;
line-height: 18px;
width: 375px;
display: block;
margin: 20px auto 30px;
color:#888888
}
.fill-form{font-size: 14px;
font-weight: 700;
color: #fff;
display: inline-block;
text-decoration: none;
line-height: 22px;
cursor: pointer;
margin-right: 10px;
}
#trickstown-contact-outer p {
color: #888888;
}
#trickstown-contact-outer .fill-form span {font-size: 14px;
font-weight: 700;
color: #fff;d
isplay: inline-block;
text-decoration: none;
line-height: 22px;
position: relative;
opacity: .8;
filter: alpha(opacity=80);
cursor: pointer;
margin-right: 10px;
margin-top:20px;}
#trickstown-contact-outer .fill-form span:after {content:url(https://blogger.googleusercontent.com/img/b/R29vZ2xl/AVvXsEjz-hFoiGnOZ-ZF-rRy1EzQvYs3irhpWYPyo_i0WN4XjBEOuPCnIBUBOiQMFHm6f37UP1-_fJj_g9CZBN5ZpIoau88zrGUKXR9J_EoEGd_hQk6hoaQSovdCeUCL-eGv3ULse0t5xxF01w/s1600/read-more-plus.png);
position: absolute;
top: 0;
right: -30px;
opacity: .4;
filter: alpha(opacity=40);
}
#trickstown-contact-outer .fill-form span:hover {
border-bottom: 1px solid #fe544a;}
#trickstown-contact-outer .fill-form span:hover:after{opacity:1;
filter:alpha(opacity=100)}
.close {cursor: pointer;
width: 23px;
height: 23px;
background: url(https://blogger.googleusercontent.com/img/b/R29vZ2xl/AVvXsEhQ8H-WlCLYHX6GHmo5DDUNkexhrJHv2KhLkoMQ7GoMnDyrnwg4OER29A3Y_oFnZLnpx3t8ElaFNM7cF4h5lixX0ykAe1pv-loBakvoPU7Uf9caI4G3VL5VZmwlk2ky5XumPXIdREGSiQ/s1600/profile-close.png) no-repeat;
opacity: .2;
filter: alpha(opacity=20);
text-indent: -9999px;
float:right;d
isplay:none;
}
.close:hover{opacity:1;
filter:alpha(opacity=100)}
#image{ display:none;
position:relative;}
#trickstown-social-icons {
position: relative;
top: -97px;
list-style: none;
margin: 0 auto 50px;
padding: 0;
width: 125px;
text-align: center;}
#trickstown-social-icons li a {
background: url(https://blogger.googleusercontent.com/img/b/R29vZ2xl/AVvXsEigR6CQ9AENc6jsyjgQfNEIdmRr30U6k3gVHJi2WokvgLmw1_kP982nL3OrY5JpJ0N5DT_4G45YawsK8_3Zupm4HXdQbafSex7ZI5qA125yZ7Ft9A2FCVRHwdcvPXt4gVb6_cuU4U6fmA/s1600/social-icons.png) no-repeat;
text-indent: -9999px;
margin: 0 5px 5px 0;
width: 26px;
height: 26px;
opacity: .9;
filter: alpha(opacity=90);
float:left;
}
#trickstown-social-icons .twitter {
background-position: -54px -80px;
}
#trickstown-social-icons .facebook {
background-position: -27px 0;
}
#trickstown-social-icons .google-plus {
background-position: -54px -26px;
}
#trickstown-social-icons .linkedin {
background-position: -54px -53px;
}
#trickstown-info{display:none;}
#trickstown-contact-wrap:before, #trickstown-contact-wrap:after {
z-index: -1;
position: absolute;
content: "";
bottom: 15px;
left: 10px;
width: 50%;
top: 80%;
max-width:300px;
background: rgba(0, 0, 0, 0.7);
-webkit-box-shadow: 0 15px 10px rgba(0,0,0, 0.7);
-moz-box-shadow: 0 15px 10px rgba(0, 0, 0, 0.7);
box-shadow: 0 15px 10px rgba(0, 0, 0, 0.7);
-webkit-transform: rotate(-3deg);
-moz-transform: rotate(-3deg);
-o-transform: rotate(-3deg);
-ms-transform: rotate(-3deg);
transform: rotate(-3deg);
}
#trickstown-contact-wrap:after {
-webkit-transform: rotate(3deg);
-moz-transform: rotate(3deg);
-o-transform: rotate(3deg);
-ms-transform: rotate(3deg);
transform: rotate(3deg);
right: 10px;
left: auto;
}
#trickstown-contact-wrap .btn {
margin-top: 10px;
margin-left:auto;
margin-right:auto;
padding: 7px 25px;
cursor: pointer;
color: #fff;
font: bold 13px Tahoma, Verdana, Arial;
text-transform: uppercase;
overflow: visible; /* IE6/7 fix */
border: 0;
background-color: #557f9d;
background-image: -moz-linear-gradient(#227bb9, #557f9d);
background-image: -webkit-gradient(linear, left top, left bottom, from(#227bb9), to(#557f9d));
background-image: -webkit-linear-gradient(#227bb9, #557f9d);
background-image: -o-linear-gradient(#227bb9, #557f9d);
background-image: -ms-linear-gradient(#227bb9, #557f9d);
background-image: linear-gradient(#227bb9, #557f9d);
filter: progid:DXImageTransform.Microsoft.gradient(startColorStr='#227bb9', EndColorStr='#557f9d');
-moz-border-radius: 3px;
-webkit-border-radius: 3px;
border-radius: 3px;
text-shadow: 0 1px 0 rgba(0,0,0,.3);
-moz-box-shadow: 0 1px 0 rgba(255, 255, 255, 0.5), 0 3px 0 rgba(0, 0, 0, 0.7);
-webkit-box-shadow: 0 1px 0 rgba(255, 255, 255, 0.5), 0 3px 0 rgba(0, 0, 0, 0.7);
box-shadow: 0 1px 0 rgba(255, 255, 255, 0.5), 0 3px 0 rgba(0, 0, 0, 0.7);
}
#trickstown-contact-wrap .btn:hover {
background-color: #557f9d;
background-image: -moz-linear-gradient(#557f9d, #a5b8da);
background-image: -webkit-gradient(linear, left top, left bottom, from(#557f9d), to(#a5b8da));
background-image: -webkit-linear-gradient(#557f9d, #a5b8da);
background-image: -o-linear-gradient(#557f9d, #a5b8da);
background-image: -ms-linear-gradient(#557f9d, #a5b8da);
background-image: linear-gradient(#557f9d, #a5b8da);
filter: progid:DXImageTransform.Microsoft.gradient(startColorStr='#557f9d', EndColorStr='#a5b8da');
}
#trickstown-contact-wrap .btn:active {
background: #64799e;
position: relative;
top: 2px;
-moz-box-shadow: 0 0 3px rgba(0, 0, 0, 0.7) inset;
-webkit-box-shadow: 0 0 3px rgba(0, 0, 0, 0.7) inset;
box-shadow: 0 0 3px rgba(0, 0, 0, 0.7) inset;
}
#trickstown-contact-wrap form {
background: #fff;
height: auto;
min-height:400px;
}
#trickstown-contact-wrap #custom-form-inner {
margin: 0 auto;
padding-top: 35px;
padding-bottom: 40px;
margin-bottom:20px;
}
#trickstown-contact-wrap label {
font: bold 18px/25px Corbel, Arial, Helvetica;
text-shadow: 0 1px 0 #fff, 0 2px 0 #ccc;
float: left;
margin-right: 10px;
width: 120px;
}
#trickstown-contact-wrap .field {
font: 15px Arial, Helvetica;
padding: 5px;
margin: 0 0 20px 0;
border: 1px solid #b9bdc1;
width: 75%;
color: #797979;
-moz-box-shadow: 0 2px 4px #bbb inset;
-webkit-box-shadow: 0 2px 4px #bbb inset;
box-shadow: 0 2px 4px #bbb inset;
-moz-border-radius: 3px;
-webkit-border-radius: 3px;
border-radius: 3px;
}
#trickstown-contact-wrap .field:focus {
background-color: #F6F5F4;
border-color:rgb(12, 155, 126);
box-shadow:0 0 4px rgb(12, 155, 126);
-webkit-box-shadow:0 0 4px rgb(12, 155, 126);
-moz-box-shadow:0 0 4px rgb(12, 155, 126);
}
#trickstown-contact-wrap .textarea {
height:auto;
min-height:100px;
max-width:75%;
}
</style>
<div class="trickstown">
<span class="close">Close</span>
<div id="trickstown-contact-outer">
<div style=" border-bottom:1px solid #1d1d1d;" id="bioinfo">
<h1>Contact Us</h1><br/>
<h2>Just fill up the form click the send button, we will respond to you shortly.</h2>
<p id="my-tt-message" style="display: block; text-align: center;height: 18px; margin-bottom: 30px; margin-top: 20px;">We are happy to help you always.</p>
<div id="image">
<div id="trickstown-contact-wrap">
<form action="send-mail.php" method="post">
<div id="custom-form-inner">
<label for="name">Name:</label>
<input type="text" class="field" id="name" name="name" placeholder="Enter your name here">
<label for="email">Email:</label>
<input type="email" class="field" id="email" name="email" placeholder="Enter a valid email address">
<label for="message">Message:</label>
<textarea class="field textarea" id="message" name="msg" placeholder="Type in your message here"></textarea>
<br />
<input type="reset" class="btn" value=" Reset">
<input type="submit" name="send" class="btn" value="Submit">
</div>
</form>
</div>
</div>
</div>
<p class="fill-form" style="display: block; "><span>Fill up a form here.</span></p>
<ul id="trickstown-social-icons">
<li><a class="twitter" target="_blank" href="http://www.twitter.com/user-name" title="@trickstown on Twitter">Twitter</a></li>
<li><a class="facebook" target="_blank" href="http://www.facebook.com/user-name" title="Facebook Profile">Facebook</a></li>
<li><a class="google-plus" target="_blank" href="https://plus.google.com/user-name/" title="Google+ Profile">Google+</a></li>
<li><a class="linkedin" target="_blank" href="http://in.linkedin.com/in/user-name" title="Linkedin Profile">LinkedIn</a></li>
</ul>
<p id="trickstown-info" style="font-size: 14px;line-height: 22px;">We are available on social sites too.</p>
</div>
</div>
Copy the below code and name it as send-mail.php.
Please note that don't change the file names if you don't know php.
send-mail.php
<html>Replace YOUR-MAIL-ID with your mail id and save the above code as send-mail.php. Now upload the both files to your server through ftp and enter your details through the form and check your mail.
<head>
<title>Thank You</title>
<link rel="stylesheet" type="text/css" href="style.css" />
</head>
<body>
<div class="main">
<?php
if(isset($_POST['send']))
{
$name=$_POST['name'];
$email=$_POST['email'];
$msg=$_POST['msg'];
$to="YOUR-MAIL-ID";
$from = "Sent From: Tricks Town Contact Form";
$sub = "Contact Message";
$headers='From : '.$email. "\r\n";
$headers='Sender name : '.$name. "\r\n";
$headers='Message : '.$msg. "\r\n";
$headers .= "MIME-Version: 1.0" . "\r\n";
$headers .= "Content-type:text/html;charset=iso-8859-1" . "\r\n";
if (mail ($to, $sub, $headers, $from)) {
echo '<b style="color:#388440; ">Thank you, we will respond you back soon.</b>';
} else {
echo '<b style="color:#e41e1e; ">Something went wrong. Please try again!</b>';
}
}
?>
</div>
</body>
</html>
Please comment below if you have anything to share or ask to ask queries. Thank you. Labels: PHP, Web Design
Subscribe to:
Comments (Atom)
