

Friday, February 21, 2014
How to delete a file using PHP


When I was working with a project with file uploads, I had a thought of deleting those files with php. unlink is used to delete a file from a folder. It takes the file path along with the file name as parameter. This funtion can be simply written as shown below.
unlink("path_to_img/file_name.extension");For example if you want to delete a text file sample.txt which inside the folder uploads then you need to use like this unlink("uploads/sample.txt);
You can use the same code to delete any file, just by changing the file extension.
Thank you very much. If you have any doubts just comment below. I'm always happy to help you.
Tags:
How to delete a file using PHP? How to delete a file from a folder using PHP? php code to delete a file
php code to unlink a file. from folder remove file using php .
remove files from folder using php
php script to remove files
php script to delet files
how can i remove file using php
how can i delete a file using php
php delete file
php file delete
php files delete using code
php deletion of a file
file deletion using php
delete an image using php
delete a photo using php
delete photo images with php
php code to delete photos
php photo deleting code
php function to delete photo
php function to remove images
php function to remove images photos and files
How to delete a file using php
how to delete an image from folder using php
how can i delete photo usnig php
Labels: PHP, Web Development
How to connect mysql database using PHP
We have seen how to fetch youtube videos using simple javascript in our previous tutorial. Today's tutorial is about connecting our database using PHP. Since PHP is a dynamic scripting language and it uses mysql database in the back end to store the data. That means the php file has to be configured to connect the database. This can be done very easily with a simple php code. This tutorial will help you to connect to the database. The database connection needs four parameters to be passed into two functions. mysql_connect() and mysql_select_db() are the two functions to connect to the database.mysql_connect() function requires three parameters and this function is used to connect to the database. and mysql_select_db() function is used to select the database.
Here is the simple code that you can simply copy and use to connect your database with php.
<?phpNow replace root with your database username database_password with your database password database_name with your database username. That's it, you are done.
$dbhost = "localhost"; //host name (usually localhost)
$dbuser = "root"; //your database(mysql) user name
$dbpass = "database_password"; //your database (mysql) password
$dbname = "database_name"; //database name
$conn = mysql_connect($dbhost, $dbuser, $dbpass) or die ("Error connecting to database");
mysql_select_db($dbname) or die ("Error selecting the database");
?>
Please don't hesitate to ask your queries. Thank you Labels: MySQL, PHP
Thursday, February 13, 2014
How to fetch youtube video thumbnail title using javascript

Hi friends, we have discussed about pagination tutorial using PHP and MySql in previous post. In this tutorial I came up with a script to fetch youtube videos on the client side using javascript. Sometimes we need to put video thumbnail and it's title to show as gallery. I worried about fetching videos into my website first. I googled for the code and found youtube API code. Using youtube API we can retrieve upto 50 videos. Youtube API code fetches last 50 videos uploaded by the user through feeds.
Now let me explain you about the javascript code to fetch youtube videos. It contains a small code that fetches the video thumbnails directly from youtube into your site. You just need to put video id into the code. Here in this tutorial I have included CSS styles to give a style to the video thumbnails.
Javascript code with HTML:
<div id="vidC">
<div id="vidThumb">
<script type="text/javascript">
//function to call youtube feeds
function youtubeFeedCallback(data) {
var s = '';
s += '<img src="http://i1.ytimg.com/vi/YOUTUBE-VIDEO-ID/mqdefault.jpg"/>'; //fetching the thumbnail image of the video
s += '<p style="color:white; font-size:13px;"> ' + data.entry.title.$t + '</p>'; //here we get the title of the video
document.write(s);//writes the above values in HTML
}
</script>
<!--youtube feeds API-->
<script type="text/javascript" src="http://gdata.youtube.com/feeds/api/videos/YOUTUBE-VIDEO-ID?v=2&alt=json-in-script&callback=youtubeFeedCallback"></script>
</div>
Copy the above code and replace YOUTUBE-VIDEO-ID with the video ID from youtube.
Ex:
<script type="text/javascript">
//function to call youtube feeds
function youtubeFeedCallback(data) {
var s = '';
s += '<img src="http://i1.ytimg.com/vi/mhzyi9nDHFI/mqdefault.jpg"/>'; //fetching the thumbnail image of the video
s += '<p style="color:white; font-size:13px;"> ' + data.entry.title.$t + '</p>'; //here we get the title of the video
document.write(s);//writes the above values in HTML
}
</script>
<!--youtube feeds API-->
<script type="text/javascript" src="http://gdata.youtube.com/feeds/api/videos/mhzyi9nDHFI?v=2&alt=json-in-script&callback=youtubeFeedCallback"></script>
If you want to include styles then just copy the below CSS code.
<style>Put these both blocks of code in a file and save it in HTML. Now the code will fetch the youtube thumbnails along with their titles.
#vidC {
width: 282px;
height: 190px;
padding: 5px;
margin-right: 15px;
background-color: #000000;
box-shadow:2px 0px 10px #333333;
margin-bottom: 20px;
float: left;
}
#vidThumb img{
width: 282px;
height: 158px;
padding: 0;
border:none;
}
</style>
Thank you. Please comment below if you need any help regarding this tutorial.
Labels: Javascript, Tips and Tricks, Web Development, Youtube
Wednesday, February 12, 2014
Create simple pagination with PHP and MySQL

Hi friends, todays tutorial is about creating a simple pagination using PHP and MySQL. I am going to explain you about creating a page with PREVIOUS and NEXT links at the bottom of your page with numberings.
Before looking at the code let's discuss about pagination concept. Pagination let's you create links that contains the data which is the continuation of the current item. Whenever there is large amount of data then it looks hard to load the entire data into a single page. Hence, we use the concept of pagination to allow the content to be split into parts and show only some part of the content per each page. This will give your website viewers a great experience and also has an advantage of speed loading of data, inorder to avoid the inconvenience.
You may also like:
Beautiful contact form for websites
Add Google plus follower widget to blogger
Stylish sticky menu bar with social icons for footer
Make money with facebook
Add contact form to your blogger blog free
Get more visitors to your site with SEO
Remove facebook graph search
Trick to find fake accounts on facebook
Get free mobile balance 100% working trick in India only
Speed loading like button for blogger
Delete facebook account permanently 100% working trick
Trick to use facebook on slow internet
How to get more page likes on facebook
How to delete google search history
8 Tricks to reduce load time of your website
3 ways to make money online without investment
5 idiotic ways to promote your blog
I said before that this code is based on PHP and MySQL, hence this code reads the data from the database tables and displays it on our page with pagination links. Since the data is being retrieved from the tables in the database we need to use sql connection mysql_connect() and then we need select database using mysql_select_db(). Let us see briefly how to connect to database using these two functions in PHP.
Code for Database connection:
<?phpThe above code is used for datavase connection. Now let's see the code that is required to generate pagination links.
$dbhostname = "host name here"; //replace with your host name usually localhostname
$dbusername = "database user name"; //replace with your database user name.
$dbpassword = "database password"; //replace with your password
$dbname = "database name"; //replace with your database name
$conn = mysql_connect($dbhostname, $dbusername, $dbpassword) or die ("Database connection failed");
mysql_select_db($dbname) or die ("Database selection failed");
?>
Code to generate pagination:
<?phpThe above part of the code is to generate pagination links. I have clearly explained within the comments. So please look the code carefully and understand it. The above code is not included with database connection. Hence we can combine both the above codes together as shown below.
function create_pagination($current_page, $total_pages)
{
$create_page_links = '';
// generates anchor tag for previous page if this is not first page
if ($current_page > 1)
{
$create_page_links .= '<a href="current-page-name.php?page=' . ($current_page - 1) . '">PREV</a> ';
}
// generates page links with numbers till the loop ends
for ($count = 1; $count <= $total_pages; $count++)
{
if ($current_page == $count)
{
$create_page_links .= ' ' . $count;
}
else
{
$create_page_links .= ' <a href="' . $_SERVER['PHP_SELF'] . '?page=' . $count . '"> ' . $count . '</a>';
}
}
// generates anchor tag link for next page if this is not last page
if ($current_page < $total_pages) {
$create_page_links .= ' <a href="' . $_SERVER['PHP_SELF'] . '?page=' . ($current_page + 1) . '">NEXT</a>';
}
return $create_page_links;
}
// Calculate pagination
$current_page = isset($_GET['page']) ? $_GET['page'] : 1;
$results_per_page =15; // displays number of results per single page replace 15 with number of pages you may want
$jump = (($current_page - 1) * $results_per_page); //3*2
$query = "select * FROM table_name order by id desc";//query to select from table
$result = mysql_query($query1);
$total = mysql_num_rows($result); //counts number of rows
$total_pages = ceil($total / $results_per_page);
$query = $query . " LIMIT $jump, $results_per_page";
$result = mysql_query($query);
while($row = mysql_fetch_array($result))
{
//your code here to retrieve rows
}
?>
<!--creates links to display at bottom with previous, next and page numbers-->
<div style="float:left; padding:20px">
<?php
if ($total_pages > 1)
{
echo create_pagination($current_page, $total_pages);
}
?>
</div>
Pagination code with database connection:
The above code is the final one.Copy the code and use it wherever you want.<?php$dbhostname = "host name here"; //replace with your host name usually localhostname
$dbusername = "database user name"; //replace with your database user name.
$dbpassword = "database password"; //replace with your password
$dbname = "database name"; //replace with your database name
$conn = mysql_connect($dbhostname, $dbusername, $dbpassword) or die ("Database connection failed");
mysql_select_db($dbname) or die ("Database selection failed");
function create_pagination($current_page, $total_pages)
{
$create_page_links = '';
// generates anchor tag for previous page if this is not first page
if ($current_page > 1)
{
$create_page_links .= '<a href="current-page-name.php?page=' . ($current_page - 1) . '">PREV</a> ';
}
// generates page links with numbers till the loop ends
for ($count = 1; $count <= $total_pages; $count++)
{
if ($current_page == $count)
{
$create_page_links .= ' ' . $count;
}
else
{
$create_page_links .= ' <a href="' . $_SERVER['PHP_SELF'] . '?page=' . $count . '"> ' . $count . '</a>';
}
}
// generates anchor tag link for next page if this is not last page
if ($current_page < $total_pages) {
$create_page_links .= ' <a href="' . $_SERVER['PHP_SELF'] . '?page=' . ($current_page + 1) . '">NEXT</a>';
}
return $create_page_links;
}
// Calculate pagination
$current_page = isset($_GET['page']) ? $_GET['page'] : 1;
$results_per_page =15; // displays number of results per single page replace 15 with number of pages you may want
$jump = (($current_page - 1) * $results_per_page); //3*2
$query = "select * FROM table_name order by id desc";//query to select from table
$result = mysql_query($query1);
$total = mysql_num_rows($result); //counts number of rows
$total_pages = ceil($total / $results_per_page);
$query = $query . " LIMIT $jump, $results_per_page";
$result = mysql_query($query);
while($row = mysql_fetch_array($result))
{
//your code here to retrieve rows}
?>
<!--creates links to display at bottom with previous, next and page numbers-->
<div style="float:left; padding:20px">
<?php
if ($total_pages > 1)
{
echo create_pagination($current_page, $total_pages);
}
?>
</div>
Note: Now just make these changes before using the code.
host name here //replace with your host name usually localhostname
database user name //replace with your database user name.
database password//replace with your password
database name //replace with your database name
current-page-name.php //Replace with the name of the page where this code is being used.
$results_per_page =15 //change 15 to whatever the number results you may want to display ina single page
//your code here to retrieve rows //Code to fetch the rows from a database table
Thanks for reading this articles.
If you still have any queries then please don't hesitate to comment below. Labels: MySQL, PHP, Web Design, Web Development
Sunday, February 2, 2014
CSS3 Stylish Contact Form with JQuery toggle and PHP
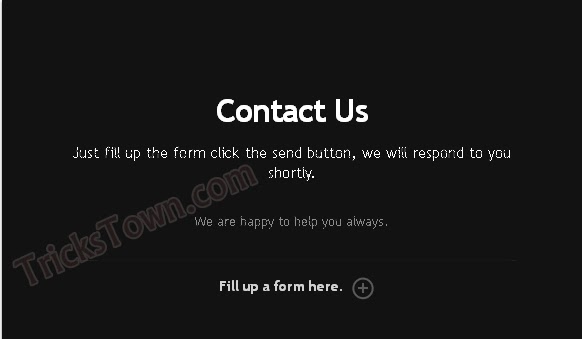 Hi friends, we have discussed about creating a beautiful contact form before. We also discussed about the importance of a contact form. You must know why a contact form is important. If you are running a business and you own a website for your business then your customers can easily contact you through your website. This will let you get new customers through your business website. There are many chances of losing customers from you if you are not available to your customers. The chance of losing customers can be avoided with a simple contact form. This form is an advanced version of the previous contact form and is having stylish look. You need to think about the UI design of your contact form. Because the great looks of your form can impress your customers much more than the old looks. This form has a JQuery toggle slide down and has designed with CSS3 to add awesome looks to the form.
You may also like:
Beautiful contact form for websites
Add Google plus follower widget to blogger
Stylish sticky menu bar with social icons for footer
Make money with facebook
Add contact form to your blogger blog free
Get more visitors to your site with SEO
Remove facebook graph search
 Trick to find fake accounts on facebook
Get free mobile balance 100% working trick in India only
Speed loading like button for blogger
Delete facebook account permanently 100% working trick
Trick to use facebook on slow internet
How to get more page likes on facebook
How to delete google search history
8 Tricks to reduce load time of your website
3 ways to make money online without investment
5 idiotic ways to promote your blog
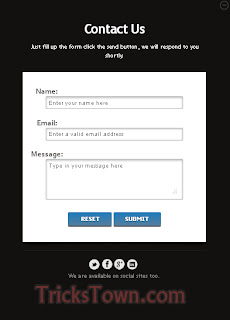
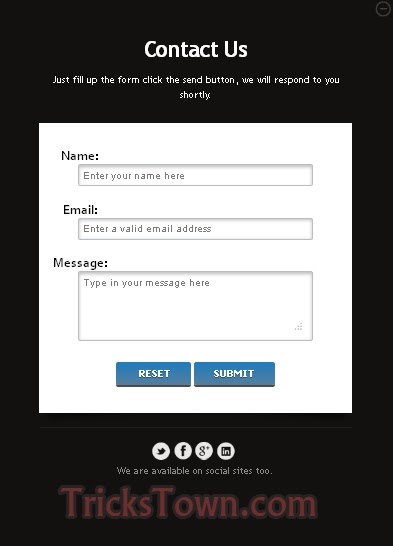
The form looks as shown in the first image and when you click on the plus button it will slide down and with a form. This leaves much more impression on your business. The messages sent through the form are received directly into your mail.View Demo
Now let's see the code that is needed for creating this stylish contact form.
First let us look at the HTML code to make a form.
<form action="send-mail.php" method="post">The above code is a simple HTML form with name, email and message fields and two buttons to reset the form and the other is to submit the form. I have shown you just a form in HTML. Just see that to learn how to create a form if you are new to HTML.
<div id="custom-form-inner">
<label for="name">Name:</label>
<input type="text" class="field" id="name" name="name" placeholder="Enter your name here">
<label for="email">Email:</label>
<input type="email" class="field" id="email" name="email" placeholder="Enter a valid email address">
<label for="message">Message:</label>
<textarea class="field textarea" id="message" name="msg" placeholder="Type in your message here"></textarea>
<br />
<input type="reset" class="btn" value=" Reset">
<input type="submit" name="send" class="btn" value="Submit">
</div>
</form>
Now I want to give you the actual HTML code required to create stylish contact form.
HTML code:
<div class="trickstown">Now that you have seen the HTML code for this stylish contact form and in the next step I'll show you the CSS required to apply styles to the form.
<span class="close">Close</span>
<div id="trickstown-contact-outer">
<div style=" border-bottom:1px solid #1d1d1d;" id="bioinfo">
<h1>Contact Us</h1><br/>
<h2>Just fill up the form click the send button, we will respond to you shortly.</h2>
<p id="my-tt-message" style="display: block; text-align: center;height: 18px; margin-bottom: 30px; margin-top: 20px;">We are happy to help you always.</p>
<div id="image">
<div id="trickstown-contact-wrap">
<form action="send-mail.php" method="post">
<div id="custom-form-inner">
<label for="name">Name:</label>
<input type="text" class="field" id="name" name="name" placeholder="Enter your name here">
<label for="email">Email:</label>
<input type="email" class="field" id="email" name="email" placeholder="Enter a valid email address">
<label for="message">Message:</label>
<textarea class="field textarea" id="message" name="msg" placeholder="Type in your message here"></textarea>
<br />
<input type="reset" class="btn" value=" Reset">
<input type="submit" name="send" class="btn" value="Submit">
</div>
</form>
</div>
</div>
</div>
<p class="fill-form" style="display: block; "><span>Fill up a form here.</span></p>
<ul id="trickstown-social-icons">
<li><a class="twitter" target="_blank" href="http://www.twitter.com/user-name" title="@trickstown on Twitter">Twitter</a></li>
<li><a class="facebook" target="_blank" href="http://www.facebook.com/user-name" title="Facebook Profile">Facebook</a></li>
<li><a class="google-plus" target="_blank" href="https://plus.google.com/+user-name/" title="Google+ Profile">Google+</a></li>
<li><a class="linkedin" target="_blank" href="http://in.linkedin.com/in/user-name" title="Linkedin Profile">LinkedIn</a></li>
</ul>
<p id="trickstown-info" style="font-size: 14px;line-height: 22px;">We are available on social sites too.</p>
</div>
</div>
CSS Code:
<style>The above code is to apply styles to the contact form. This is a CSS3 code to bring you out the awesome look for a contact form.
.trickstown{
background-color:#111111;
margin:0 auto;
margin-top:200px;
width:560px;
padding:10px;
height:320px;
-webkit-box-shadow: 0 1px 2px #666;
box-shadow: 0 1px 2px #666;
}
#trickstown-contact-outer{
font-family:"Trebuchet MS", Arial, Helvetica, sans-serif;
text-align:center;
width:450px;
margin:0 auto;
margin-top:80px;
}
#bioinfo{background-color:#111111;
position:relative;
z-index:999;
}
#trickstown-contact-outer h1{color:#FFF;
font-family:"Trebuchet MS", Arial, Helvetica, sans-serif;
font-size:32px;
font-weight:700px;
margin:0;
padding:0;
letter-spacing:-1px;
}
#trickstown-contact-outer h2{ color:#FFF;
margin:0;
padding:0;
font-weight:100;
font-size:15px;
font-family:"Trebuchet MS", Arial, Helvetica, sans-serif;
margin-top:-10px;
margin-bottom:30px;
}
#my-tt-message{font-size: 13px;
line-height: 18px;
width: 375px;
display: block;
margin: 20px auto 30px;
color:#888888
}
.fill-form{font-size: 14px;
font-weight: 700;
color: #fff;
display: inline-block;
text-decoration: none;
line-height: 22px;
cursor: pointer;
margin-right: 10px;
}
#trickstown-contact-outer p {
color: #888888;
}
#trickstown-contact-outer .fill-form span {font-size: 14px;
font-weight: 700;
color: #fff;d
isplay: inline-block;
text-decoration: none;
line-height: 22px;
position: relative;
opacity: .8;
filter: alpha(opacity=80);
cursor: pointer;
margin-right: 10px;
margin-top:20px;}
#trickstown-contact-outer .fill-form span:after {content:url(https://blogger.googleusercontent.com/img/b/R29vZ2xl/AVvXsEjz-hFoiGnOZ-ZF-rRy1EzQvYs3irhpWYPyo_i0WN4XjBEOuPCnIBUBOiQMFHm6f37UP1-_fJj_g9CZBN5ZpIoau88zrGUKXR9J_EoEGd_hQk6hoaQSovdCeUCL-eGv3ULse0t5xxF01w/s1600/read-more-plus.png);
position: absolute;
top: 0;
right: -30px;
opacity: .4;
filter: alpha(opacity=40);
}
#trickstown-contact-outer .fill-form span:hover {
border-bottom: 1px solid #fe544a;}
#trickstown-contact-outer .fill-form span:hover:after{opacity:1;
filter:alpha(opacity=100)}
.close {cursor: pointer;
width: 23px;
height: 23px;
background: url(https://blogger.googleusercontent.com/img/b/R29vZ2xl/AVvXsEhQ8H-WlCLYHX6GHmo5DDUNkexhrJHv2KhLkoMQ7GoMnDyrnwg4OER29A3Y_oFnZLnpx3t8ElaFNM7cF4h5lixX0ykAe1pv-loBakvoPU7Uf9caI4G3VL5VZmwlk2ky5XumPXIdREGSiQ/s1600/profile-close.png) no-repeat;
opacity: .2;
filter: alpha(opacity=20);
text-indent: -9999px;
float:right;d
isplay:none;
}
.close:hover{opacity:1;
filter:alpha(opacity=100)}
#image{ display:none;
position:relative;}
#trickstown-social-icons {
position: relative;
top: -97px;
list-style: none;
margin: 0 auto 50px;
padding: 0;
width: 125px;
text-align: center;}
#trickstown-social-icons li a {
background: url(https://blogger.googleusercontent.com/img/b/R29vZ2xl/AVvXsEigR6CQ9AENc6jsyjgQfNEIdmRr30U6k3gVHJi2WokvgLmw1_kP982nL3OrY5JpJ0N5DT_4G45YawsK8_3Zupm4HXdQbafSex7ZI5qA125yZ7Ft9A2FCVRHwdcvPXt4gVb6_cuU4U6fmA/s1600/social-icons.png) no-repeat;
text-indent: -9999px;
margin: 0 5px 5px 0;
width: 26px;
height: 26px;
opacity: .9;
filter: alpha(opacity=90);
float:left;
}
#trickstown-social-icons .twitter {
background-position: -54px -80px;
}
#trickstown-social-icons .facebook {
background-position: -27px 0;
}
#trickstown-social-icons .google-plus {
background-position: -54px -26px;
}
#trickstown-social-icons .linkedin {
background-position: -54px -53px;
}
#trickstown-info{display:none;}
#trickstown-contact-wrap:before, #trickstown-contact-wrap:after {
z-index: -1;
position: absolute;
content: "";
bottom: 15px;
left: 10px;
width: 50%;
top: 80%;
max-width:300px;
background: rgba(0, 0, 0, 0.7);
-webkit-box-shadow: 0 15px 10px rgba(0,0,0, 0.7);
-moz-box-shadow: 0 15px 10px rgba(0, 0, 0, 0.7);
box-shadow: 0 15px 10px rgba(0, 0, 0, 0.7);
-webkit-transform: rotate(-3deg);
-moz-transform: rotate(-3deg);
-o-transform: rotate(-3deg);
-ms-transform: rotate(-3deg);
transform: rotate(-3deg);
}
#trickstown-contact-wrap:after {
-webkit-transform: rotate(3deg);
-moz-transform: rotate(3deg);
-o-transform: rotate(3deg);
-ms-transform: rotate(3deg);
transform: rotate(3deg);
right: 10px;
left: auto;
}
#trickstown-contact-wrap .btn {
margin-top: 10px;
margin-left:auto;
margin-right:auto;
padding: 7px 25px;
cursor: pointer;
color: #fff;
font: bold 13px Tahoma, Verdana, Arial;
text-transform: uppercase;
overflow: visible; /* IE6/7 fix */
border: 0;
background-color: #557f9d;
background-image: -moz-linear-gradient(#227bb9, #557f9d);
background-image: -webkit-gradient(linear, left top, left bottom, from(#227bb9), to(#557f9d));
background-image: -webkit-linear-gradient(#227bb9, #557f9d);
background-image: -o-linear-gradient(#227bb9, #557f9d);
background-image: -ms-linear-gradient(#227bb9, #557f9d);
background-image: linear-gradient(#227bb9, #557f9d);
filter: progid:DXImageTransform.Microsoft.gradient(startColorStr='#227bb9', EndColorStr='#557f9d');
-moz-border-radius: 3px;
-webkit-border-radius: 3px;
border-radius: 3px;
text-shadow: 0 1px 0 rgba(0,0,0,.3);
-moz-box-shadow: 0 1px 0 rgba(255, 255, 255, 0.5), 0 3px 0 rgba(0, 0, 0, 0.7);
-webkit-box-shadow: 0 1px 0 rgba(255, 255, 255, 0.5), 0 3px 0 rgba(0, 0, 0, 0.7);
box-shadow: 0 1px 0 rgba(255, 255, 255, 0.5), 0 3px 0 rgba(0, 0, 0, 0.7);
}
#trickstown-contact-wrap .btn:hover {
background-color: #557f9d;
background-image: -moz-linear-gradient(#557f9d, #a5b8da);
background-image: -webkit-gradient(linear, left top, left bottom, from(#557f9d), to(#a5b8da));
background-image: -webkit-linear-gradient(#557f9d, #a5b8da);
background-image: -o-linear-gradient(#557f9d, #a5b8da);
background-image: -ms-linear-gradient(#557f9d, #a5b8da);
background-image: linear-gradient(#557f9d, #a5b8da);
filter: progid:DXImageTransform.Microsoft.gradient(startColorStr='#557f9d', EndColorStr='#a5b8da');
}
#trickstown-contact-wrap .btn:active {
background: #64799e;
position: relative;
top: 2px;
-moz-box-shadow: 0 0 3px rgba(0, 0, 0, 0.7) inset;
-webkit-box-shadow: 0 0 3px rgba(0, 0, 0, 0.7) inset;
box-shadow: 0 0 3px rgba(0, 0, 0, 0.7) inset;
}
#trickstown-contact-wrap form {
background: #fff;
height: auto;
min-height:400px;
}
#trickstown-contact-wrap #custom-form-inner {
margin: 0 auto;
padding-top: 35px;
padding-bottom: 40px;
margin-bottom:20px;
}
#trickstown-contact-wrap label {
font: bold 18px/25px Corbel, Arial, Helvetica;
text-shadow: 0 1px 0 #fff, 0 2px 0 #ccc;
float: left;
margin-right: 10px;
width: 120px;
}
#trickstown-contact-wrap .field {
font: 15px Arial, Helvetica;
padding: 5px;
margin: 0 0 20px 0;
border: 1px solid #b9bdc1;
width: 75%;
color: #797979;
-moz-box-shadow: 0 2px 4px #bbb inset;
-webkit-box-shadow: 0 2px 4px #bbb inset;
box-shadow: 0 2px 4px #bbb inset;
-moz-border-radius: 3px;
-webkit-border-radius: 3px;
border-radius: 3px;
}
#trickstown-contact-wrap .field:focus {
background-color: #F6F5F4;
border-color:rgb(12, 155, 126);
box-shadow:0 0 4px rgb(12, 155, 126);
-webkit-box-shadow:0 0 4px rgb(12, 155, 126);
-moz-box-shadow:0 0 4px rgb(12, 155, 126);
}
#trickstown-contact-wrap .textarea {
height:auto;
min-height:100px;
max-width:75%;
}
</style>
Now we have discussed about the HTML and CSS codes required for the form. Now we have to look at JQuery code to apply toggle slide effect to the contact form.
JQuery Code:
<script src="http://code.jquery.com/jquery-1.10.1.min.js"></script>The above code is the required JQuery code to give you the best slide effects and toggle effects to your contact form.
<script>
$(document).ready(function(){
$('.fill-form').click(function(){
$(this).slideUp(300);
$('#my-tt-message').slideUp(300);
$('.trickstown').animate({height: "250px",marginTop: "250px"}, 500, function(){
$(this).delay(400).animate({height: "780px",marginTop: "80px",marginBottom: "80px"}, 500);
$('#bioinfo').delay(250).animate({marginTop: "-30px"}, 500);
$('.close').delay(50).fadeIn('slow');
$('#image').delay(1000).fadeIn('slow');
$('#trickstown-social-icons').delay(1000).slideDown('slow').animate({top: "20px"}, 500);
$('#trickstown-info').delay(1000).fadeIn(600);
});
});
$('.close').click(function(){
$(this).delay(100).fadeOut('slow');
$('#trickstown-social-icons').slideUp('slow').animate({top: "-97px"}, 500);
$('#bioinfo').delay(250).animate({marginTop: "0"}, 500);
$('#image').delay(100).fadeOut('slow');
$('#trickstown-info').hide();
$('.trickstown').delay(500).animate({height: "250px",marginTop: "250px"}, 500).delay(300).animate({height: "320px",marginTop: "200px"}, 500,function(){
$('.fill-form').slideDown(300);
$('#my-tt-message').slideDown(300);
});
});
});
</script>
Now let us put all the code together. The below code is the combination of all the above three. Copy the below code and save it as contact.html
contact.html
Copy the above code and paste it in any text editor such as notepad and save it as contact.html. Replace user-name to your user name of your social networks. Now your contact form is ready and you need to create one more page where the mail is sent to you. This page contains the configuration to send and receive mails through php.
<script src="http://code.jquery.com/jquery-1.10.1.min.js"></script>
<script>
$(document).ready(function(){
$('.fill-form').click(function(){
$(this).slideUp(300);
$('#my-tt-message').slideUp(300);
$('.trickstown').animate({height: "250px",marginTop: "250px"}, 500, function(){
$(this).delay(400).animate({height: "780px",marginTop: "80px",marginBottom: "80px"}, 500);
$('#bioinfo').delay(250).animate({marginTop: "-30px"}, 500);
$('.close').delay(50).fadeIn('slow');
$('#image').delay(1000).fadeIn('slow');
$('#trickstown-social-icons').delay(1000).slideDown('slow').animate({top: "20px"}, 500);
$('#trickstown-info').delay(1000).fadeIn(600);
});
});
$('.close').click(function(){
$(this).delay(100).fadeOut('slow');
$('#trickstown-social-icons').slideUp('slow').animate({top: "-97px"}, 500);
$('#bioinfo').delay(250).animate({marginTop: "0"}, 500);
$('#image').delay(100).fadeOut('slow');
$('#trickstown-info').hide();
$('.trickstown').delay(500).animate({height: "250px",marginTop: "250px"}, 500).delay(300).animate({height: "320px",marginTop: "200px"}, 500,function(){
$('.fill-form').slideDown(300);
$('#my-tt-message').slideDown(300);
});
});
});
</script>
<style>
.trickstown{
background-color:#111111;
margin:0 auto;
margin-top:200px;
width:560px;
padding:10px;
height:320px;
-webkit-box-shadow: 0 1px 2px #666;
box-shadow: 0 1px 2px #666;
}
#trickstown-contact-outer{
font-family:"Trebuchet MS", Arial, Helvetica, sans-serif;
text-align:center;
width:450px;
margin:0 auto;
margin-top:80px;
}
#bioinfo{background-color:#111111;
position:relative;
z-index:999;
}
#trickstown-contact-outer h1{color:#FFF;
font-family:"Trebuchet MS", Arial, Helvetica, sans-serif;
font-size:32px;
font-weight:700px;
margin:0;
padding:0;
letter-spacing:-1px;
}
#trickstown-contact-outer h2{ color:#FFF;
margin:0;
padding:0;
font-weight:100;
font-size:15px;
font-family:"Trebuchet MS", Arial, Helvetica, sans-serif;
margin-top:-10px;
margin-bottom:30px;
}
#my-tt-message{font-size: 13px;
line-height: 18px;
width: 375px;
display: block;
margin: 20px auto 30px;
color:#888888
}
.fill-form{font-size: 14px;
font-weight: 700;
color: #fff;
display: inline-block;
text-decoration: none;
line-height: 22px;
cursor: pointer;
margin-right: 10px;
}
#trickstown-contact-outer p {
color: #888888;
}
#trickstown-contact-outer .fill-form span {font-size: 14px;
font-weight: 700;
color: #fff;d
isplay: inline-block;
text-decoration: none;
line-height: 22px;
position: relative;
opacity: .8;
filter: alpha(opacity=80);
cursor: pointer;
margin-right: 10px;
margin-top:20px;}
#trickstown-contact-outer .fill-form span:after {content:url(https://blogger.googleusercontent.com/img/b/R29vZ2xl/AVvXsEjz-hFoiGnOZ-ZF-rRy1EzQvYs3irhpWYPyo_i0WN4XjBEOuPCnIBUBOiQMFHm6f37UP1-_fJj_g9CZBN5ZpIoau88zrGUKXR9J_EoEGd_hQk6hoaQSovdCeUCL-eGv3ULse0t5xxF01w/s1600/read-more-plus.png);
position: absolute;
top: 0;
right: -30px;
opacity: .4;
filter: alpha(opacity=40);
}
#trickstown-contact-outer .fill-form span:hover {
border-bottom: 1px solid #fe544a;}
#trickstown-contact-outer .fill-form span:hover:after{opacity:1;
filter:alpha(opacity=100)}
.close {cursor: pointer;
width: 23px;
height: 23px;
background: url(https://blogger.googleusercontent.com/img/b/R29vZ2xl/AVvXsEhQ8H-WlCLYHX6GHmo5DDUNkexhrJHv2KhLkoMQ7GoMnDyrnwg4OER29A3Y_oFnZLnpx3t8ElaFNM7cF4h5lixX0ykAe1pv-loBakvoPU7Uf9caI4G3VL5VZmwlk2ky5XumPXIdREGSiQ/s1600/profile-close.png) no-repeat;
opacity: .2;
filter: alpha(opacity=20);
text-indent: -9999px;
float:right;d
isplay:none;
}
.close:hover{opacity:1;
filter:alpha(opacity=100)}
#image{ display:none;
position:relative;}
#trickstown-social-icons {
position: relative;
top: -97px;
list-style: none;
margin: 0 auto 50px;
padding: 0;
width: 125px;
text-align: center;}
#trickstown-social-icons li a {
background: url(https://blogger.googleusercontent.com/img/b/R29vZ2xl/AVvXsEigR6CQ9AENc6jsyjgQfNEIdmRr30U6k3gVHJi2WokvgLmw1_kP982nL3OrY5JpJ0N5DT_4G45YawsK8_3Zupm4HXdQbafSex7ZI5qA125yZ7Ft9A2FCVRHwdcvPXt4gVb6_cuU4U6fmA/s1600/social-icons.png) no-repeat;
text-indent: -9999px;
margin: 0 5px 5px 0;
width: 26px;
height: 26px;
opacity: .9;
filter: alpha(opacity=90);
float:left;
}
#trickstown-social-icons .twitter {
background-position: -54px -80px;
}
#trickstown-social-icons .facebook {
background-position: -27px 0;
}
#trickstown-social-icons .google-plus {
background-position: -54px -26px;
}
#trickstown-social-icons .linkedin {
background-position: -54px -53px;
}
#trickstown-info{display:none;}
#trickstown-contact-wrap:before, #trickstown-contact-wrap:after {
z-index: -1;
position: absolute;
content: "";
bottom: 15px;
left: 10px;
width: 50%;
top: 80%;
max-width:300px;
background: rgba(0, 0, 0, 0.7);
-webkit-box-shadow: 0 15px 10px rgba(0,0,0, 0.7);
-moz-box-shadow: 0 15px 10px rgba(0, 0, 0, 0.7);
box-shadow: 0 15px 10px rgba(0, 0, 0, 0.7);
-webkit-transform: rotate(-3deg);
-moz-transform: rotate(-3deg);
-o-transform: rotate(-3deg);
-ms-transform: rotate(-3deg);
transform: rotate(-3deg);
}
#trickstown-contact-wrap:after {
-webkit-transform: rotate(3deg);
-moz-transform: rotate(3deg);
-o-transform: rotate(3deg);
-ms-transform: rotate(3deg);
transform: rotate(3deg);
right: 10px;
left: auto;
}
#trickstown-contact-wrap .btn {
margin-top: 10px;
margin-left:auto;
margin-right:auto;
padding: 7px 25px;
cursor: pointer;
color: #fff;
font: bold 13px Tahoma, Verdana, Arial;
text-transform: uppercase;
overflow: visible; /* IE6/7 fix */
border: 0;
background-color: #557f9d;
background-image: -moz-linear-gradient(#227bb9, #557f9d);
background-image: -webkit-gradient(linear, left top, left bottom, from(#227bb9), to(#557f9d));
background-image: -webkit-linear-gradient(#227bb9, #557f9d);
background-image: -o-linear-gradient(#227bb9, #557f9d);
background-image: -ms-linear-gradient(#227bb9, #557f9d);
background-image: linear-gradient(#227bb9, #557f9d);
filter: progid:DXImageTransform.Microsoft.gradient(startColorStr='#227bb9', EndColorStr='#557f9d');
-moz-border-radius: 3px;
-webkit-border-radius: 3px;
border-radius: 3px;
text-shadow: 0 1px 0 rgba(0,0,0,.3);
-moz-box-shadow: 0 1px 0 rgba(255, 255, 255, 0.5), 0 3px 0 rgba(0, 0, 0, 0.7);
-webkit-box-shadow: 0 1px 0 rgba(255, 255, 255, 0.5), 0 3px 0 rgba(0, 0, 0, 0.7);
box-shadow: 0 1px 0 rgba(255, 255, 255, 0.5), 0 3px 0 rgba(0, 0, 0, 0.7);
}
#trickstown-contact-wrap .btn:hover {
background-color: #557f9d;
background-image: -moz-linear-gradient(#557f9d, #a5b8da);
background-image: -webkit-gradient(linear, left top, left bottom, from(#557f9d), to(#a5b8da));
background-image: -webkit-linear-gradient(#557f9d, #a5b8da);
background-image: -o-linear-gradient(#557f9d, #a5b8da);
background-image: -ms-linear-gradient(#557f9d, #a5b8da);
background-image: linear-gradient(#557f9d, #a5b8da);
filter: progid:DXImageTransform.Microsoft.gradient(startColorStr='#557f9d', EndColorStr='#a5b8da');
}
#trickstown-contact-wrap .btn:active {
background: #64799e;
position: relative;
top: 2px;
-moz-box-shadow: 0 0 3px rgba(0, 0, 0, 0.7) inset;
-webkit-box-shadow: 0 0 3px rgba(0, 0, 0, 0.7) inset;
box-shadow: 0 0 3px rgba(0, 0, 0, 0.7) inset;
}
#trickstown-contact-wrap form {
background: #fff;
height: auto;
min-height:400px;
}
#trickstown-contact-wrap #custom-form-inner {
margin: 0 auto;
padding-top: 35px;
padding-bottom: 40px;
margin-bottom:20px;
}
#trickstown-contact-wrap label {
font: bold 18px/25px Corbel, Arial, Helvetica;
text-shadow: 0 1px 0 #fff, 0 2px 0 #ccc;
float: left;
margin-right: 10px;
width: 120px;
}
#trickstown-contact-wrap .field {
font: 15px Arial, Helvetica;
padding: 5px;
margin: 0 0 20px 0;
border: 1px solid #b9bdc1;
width: 75%;
color: #797979;
-moz-box-shadow: 0 2px 4px #bbb inset;
-webkit-box-shadow: 0 2px 4px #bbb inset;
box-shadow: 0 2px 4px #bbb inset;
-moz-border-radius: 3px;
-webkit-border-radius: 3px;
border-radius: 3px;
}
#trickstown-contact-wrap .field:focus {
background-color: #F6F5F4;
border-color:rgb(12, 155, 126);
box-shadow:0 0 4px rgb(12, 155, 126);
-webkit-box-shadow:0 0 4px rgb(12, 155, 126);
-moz-box-shadow:0 0 4px rgb(12, 155, 126);
}
#trickstown-contact-wrap .textarea {
height:auto;
min-height:100px;
max-width:75%;
}
</style>
<div class="trickstown">
<span class="close">Close</span>
<div id="trickstown-contact-outer">
<div style=" border-bottom:1px solid #1d1d1d;" id="bioinfo">
<h1>Contact Us</h1><br/>
<h2>Just fill up the form click the send button, we will respond to you shortly.</h2>
<p id="my-tt-message" style="display: block; text-align: center;height: 18px; margin-bottom: 30px; margin-top: 20px;">We are happy to help you always.</p>
<div id="image">
<div id="trickstown-contact-wrap">
<form action="send-mail.php" method="post">
<div id="custom-form-inner">
<label for="name">Name:</label>
<input type="text" class="field" id="name" name="name" placeholder="Enter your name here">
<label for="email">Email:</label>
<input type="email" class="field" id="email" name="email" placeholder="Enter a valid email address">
<label for="message">Message:</label>
<textarea class="field textarea" id="message" name="msg" placeholder="Type in your message here"></textarea>
<br />
<input type="reset" class="btn" value=" Reset">
<input type="submit" name="send" class="btn" value="Submit">
</div>
</form>
</div>
</div>
</div>
<p class="fill-form" style="display: block; "><span>Fill up a form here.</span></p>
<ul id="trickstown-social-icons">
<li><a class="twitter" target="_blank" href="http://www.twitter.com/user-name" title="@trickstown on Twitter">Twitter</a></li>
<li><a class="facebook" target="_blank" href="http://www.facebook.com/user-name" title="Facebook Profile">Facebook</a></li>
<li><a class="google-plus" target="_blank" href="https://plus.google.com/user-name/" title="Google+ Profile">Google+</a></li>
<li><a class="linkedin" target="_blank" href="http://in.linkedin.com/in/user-name" title="Linkedin Profile">LinkedIn</a></li>
</ul>
<p id="trickstown-info" style="font-size: 14px;line-height: 22px;">We are available on social sites too.</p>
</div>
</div>
Copy the below code and name it as send-mail.php.
Please note that don't change the file names if you don't know php.
send-mail.php
<html>Replace YOUR-MAIL-ID with your mail id and save the above code as send-mail.php. Now upload the both files to your server through ftp and enter your details through the form and check your mail.
<head>
<title>Thank You</title>
<link rel="stylesheet" type="text/css" href="style.css" />
</head>
<body>
<div class="main">
<?php
if(isset($_POST['send']))
{
$name=$_POST['name'];
$email=$_POST['email'];
$msg=$_POST['msg'];
$to="YOUR-MAIL-ID";
$from = "Sent From: Tricks Town Contact Form";
$sub = "Contact Message";
$headers='From : '.$email. "\r\n";
$headers='Sender name : '.$name. "\r\n";
$headers='Message : '.$msg. "\r\n";
$headers .= "MIME-Version: 1.0" . "\r\n";
$headers .= "Content-type:text/html;charset=iso-8859-1" . "\r\n";
if (mail ($to, $sub, $headers, $from)) {
echo '<b style="color:#388440; ">Thank you, we will respond you back soon.</b>';
} else {
echo '<b style="color:#e41e1e; ">Something went wrong. Please try again!</b>';
}
}
?>
</div>
</body>
</html>
Please comment below if you have anything to share or ask to ask queries. Thank you. Labels: PHP, Web Design
Wednesday, January 1, 2014
Beautiful contact form for websites in PHP

I have designed this form for my website and I want to share it with you today. You can copy the code and use it in your websites. This form has been developed with CSS3 and PHP and keep in mind that this form is not supported on blogger blogs. If you want an awesome contact form for your blogger blog then read this article.
View Demo
Copy the code below:
contact.php
<!DOCTYPE html PUBLIC "-//W3C//DTD XHTML 1.0 Transitional//EN" "http://www.w3.org/TR/xhtml1/DTD/xhtml1-transitional.dtd">
<html xmlns="http://www.w3.org/1999/xhtml">
<head>
<title>Contact Form</title>
<link rel="stylesheet" type="text/css" href="style.css" />
<script src="http://code.jquery.com/jquery-1.7.2.min.js"></script>
<link type="text/css" rel="stylesheet" href="demo.css">
<script>
function validate()
{
var email=document.getElementById("from").value;
if (email.length==""||email=="Your email id")
{
document.getElementById("fError").innerHTML = "Enter your email";
email.focus;
return false;
}
var mailPattern = /^([a-zA-Z0-9_\.\-])+\@(([a-zA-Z0-9\-])+\.)+([a-zA-Z0-9]{2,4})+$/;
if (!checkEmail(email)) {
document.getElementById("fError").innerHTML = "Invalid email";
debugger;
email.focus;
return false;
}
else
{
document.getElementById("fError").innerHTML = "";
}
var email=document.getElementById("msub").value;
if (email.length==""||email=="Subject of your message")
{
document.getElementById("subError").innerHTML = "Subject required";
email.focus;
return false;
}
else
{
document.getElementById("subError").innerHTML = "";
}
var msg=document.getElementById("msg").value;
if (msg.length==""||msg=="Your message")
{
document.getElementById("msgError").innerHTML = "Enter your message";
email.focus;
return false;
}
else
{
document.getElementById("msgError").innerHTML = "";
}
}
function checkEmail(email) {
var email = email;
var filter = /^([a-zA-Z0-9_\.\-])+\@(([a-zA-Z0-9\-])+\.)+([a-zA-Z0-9]{2,4})+$/;
if (!filter.test(email)) {
// alert('Please provide a valid email address');
// email.focus;
return false;
}
return true;
}
</script>
<script>
$(document).ready(function () {
resetForms();
});
function resetForms() {
document.forms['form1'].reset();
}
</script>
</head>
<body>
<div class="main">
<div class="top">Contact us</div>
<form id="form1" action="send-mail.php" method="post">
<table>
<tr><td>Email</td><td><input type="text" class="field" id="from" name="from" value="Your email id" onblur="if(value=='') value = 'Your email id'" onfocus="if(value=='Your email id') value = ''"></td><td><div id="fError" style="color:#FF0000; font-size:14px;"></div></td></tr>
<tr><td>Name </td><td><input type="text" class="field" id="name" name="name" value="Your name(optional)" onblur="if(value=='') value = 'Your name(optional)'" onfocus="if(value=='Your name(optional)') value = ''"></td><td><div id="fError" style="color:#FF0000; font-size:14px;"></div></td></tr>
<tr><td>Subject </td><td><input type="text" class="field" id="msub" name="msub" value="Subject of your message" onblur="if(value=='') value = 'Subject of your message'" onfocus="if(value=='Subject of your message') value = ''"></td><td><div id="subError" style="color:#FF0000; font-size:14px;"></div></td></tr>
<tr><td>Message</td>
<td>
<textarea type="text" class="msg" id="msg" name="msg" onfocus="if(value=='Your message') value = ''" onblur="if(value=='') value = 'Your message'">Your message</textarea>
</td>
<td><div id="msgError" style="color:#FF0000; font-size:14px;"></div></td>
</tr>
<tr>
<td></td>
<td><input type="submit" class="sendbtn" id="send" name="send" value="Send" onClick="return validate()"></td></tr>
</table>
</form>
</div>
</body>
</html>
Copy the code above and save it as contact.php
The above code contains the form design of contact page. Now lets have another page called send-mail.php. This page receives the data from the form and sends an email to you.
send-mail.php
<html>
<head>
<title>Thank You</title>
<link rel="stylesheet" type="text/css" href="style.css" />
</head>
<?php
if(isset($_POST['send']))
{
$from=$_POST['from'];
$sub=$_POST['msub'];
$msg=$_POST['msg'];
}
$message = "
<html>
<head>
<title>HTML email</title>
</head>
<body>".$msg."</body>
</html>";
$headers='From: '.$from. "\r\n";
$headers .= "MIME-Version: 1.0" . "\r\n";
$headers .= "Content-type:text/html;charset=iso-8859-1" . "\r\n";
mail('your-mail-id-here',$sub,$message,$headers);
?>
<body>
<div class="main">
<div class="top">Success</div>
<?php echo '<b style="color:#388440; ">Thanks for contacting</b>'; ?>
</div>
</body>
</html>
Here in this code you need to replace the line your-mail-id-here with your mail id. Now we have the contact form but the form needs to be designed with stylesheets. I have CSS3 styles for the form.
style.css
bodyCopy those three blocks of code and save them with the names given. Put all these files in the same folder and check them online. Note that this will not work on localhost because mail function will not work on local system.
{
font-family:"Lucida Console", Times, serif;
}
.main
{
width:500px;
margin:0px auto;
}
.field
{
width:300px;
margin:0px 10px 0px 0px;
border:#A8A8A8 solid 2px;
border-radius: 8px;
padding:10px;
box-shadow:1px 0px 9px #6E6E6E;
height:25px;
color:#999999;
font-size:14px;
font-family:Arial, Helvetica, sans-serif;
}
.field:focus
{
border-color:#00AAE7;
box-shadow:0 0 10px #00BDFF; -webkit-box-shadow:0 0 10px #00BDFF; -moz-box-shadow:0 0 10px #00BDFF;
}
textarea
{
color:#999999;
font-family:Arial, Helvetica, sans-serif;
font-size:14px;
width:300px;
height:100px;
margin:0px 10px 0px 0px;
border:#A8A8A8 solid 2px;
border-radius: 8px;
padding:10px;
box-shadow:1px 0px 9px #6E6E6E;
}
textarea:focus
{
border-color:#00AAE7;
box-shadow:0 0 10px #00BDFF; -webkit-box-shadow:0 0 10px #00BDFF; -moz-box-shadow:0 0 10px #00BDFF;
}
.top
{
height:50px;
width:98%;
background:rgb(0, 131, 202);
background-image:url(https://blogger.googleusercontent.com/img/b/R29vZ2xl/AVvXsEiXTtDDA9uizvI8IGws1arkBJQY-wE5MHJcwQ89TFG4XQIqkBttSIJ0W9PP0-wyZnYKWGflht26ODGZLO-NTFkKfaMMQK1N4XxVGwjGMguATnIps-3FH79oemU3R5L5pcEvmO5NDMwWUg/s1600/emf-envelope.png);
background-repeat:no-repeat;
background-position:1%;
border-top-left-radius:7px;
border-top-right-radius:7px;
color:#FFFFFF;
padding-top:12px;
font-size:32px;
text-align:center;
}
.sendbtn{
cursor:pointer;
padding:5px 13px;
background:rgb(0, 131, 202);
border:1px solid #1F96AD;
-moz-border-radius: 10px;
-webkit-border-radius: 10px;
border-radius: 10px;
-webkit-box-shadow: 0 0 4px rgba(0,0,0, .75);
-moz-box-shadow: 0 0 4px rgba(0,0,0, .75);
box-shadow: 0 0 4px rgba(0,0,0, .75);
color:#f3f3f3;
font-size:1.1em;
}
.sendbtn:hover, .sendbtn:focus{
background-color :#13A3D1;
-webkit-box-shadow: 0 0 1px rgba(0,0,0, .75);
-moz-box-shadow: 0 0 1px rgba(0,0,0, .75);
box-shadow: 0 0 1px rgba(0,0,0, .75);
}
Please comment below if you have anything to share or ask your queries. Thank you. Labels: PHP, Web Design
Thursday, November 21, 2013
Add Google Plus Follower Gadget For Blogger
 I have discussed about How to add sticky footer menu to your blogger in my last tutorial. Read my earlier post to add sticky footer menu to your blog.
In this tutorial I want to discuss about adding Google plus followers gadget to your blog. Blogger has recently launched its new feature to add Google+ followers gadget to your blog. This gadget helps your readers to follow you easily through your blog. This will make you help in increasing your readers by following you on google+. It doesn't require any code to add this widget to your blog. Because blogger has introduced a new gadget to add this to your blogger.
You may like to read:
How to earn money with your facebook pages?
How to add separate contact page to blogger?
How to add facebook like button below blogger posts?
Best practices to write titles for Search Engine Optimization(SEO)
Great tips to reduce loading time of your blog to increase more readers
Idiotic and funny ways you never know to promote your blog
How to earn money from blogs?
Add floating widget to your blogger blog
Get more viewers to your blog using facebook fan page
1.Login to your Blogger account first.
2.Click the arrow mark of your blog in your dashboard(shown in the figure).

3.Now select Google+.

4.Now you will be asked to change your profile data to your Google plus. That means you need to select your Google+ profile data to be your Blogger profile.
5.After making those changes in your profile, you need to go to your blog LAYOUT.
6.Select Add Gadget.
7.Click on Google+ Followers.

8.Save it.

That’s it. You are done.
Thanks for reading this post. Please comment below to share your ideas or suggestions or ask your queries if you need any help.
Don’t hesitate to ask me your doubts regarding blogger. I am always ready to help you. Labels: Blogger Plugins, blogger tips
How to add floating widget to blogger blog
In previous article we have discussed about adding a google plus follower gadget. In this post I'm going to show you how to create floating widget with simple css and adding it to your blogger blog. This will be helpful when you want to show ads or widgets that float. I already discussed how to add floating sticky meny with social widget bar at bottom of your blog.Here is how to add this floating widget to your blog. Before adding this you need to backup your template.
Here is a simple CSS code and small HTML div to add.
You may like to read: How to earn money with your facebook pages?
How to add separate contact page to blogger?
How to add facebook like button below blogger posts?
Best practices to write titles for Search Engine Optimization(SEO)
Great tips to reduce loading time of your blog to increase more readers
Idiotic and funny ways you never know to promote your blog
How to earn money from blogs?
Get more viewers to your blog using facebook fan page
Go to template.
Click Backup/Restore.
Download the template.
Be careful: Backup your template first before you continue further.
Edit HTML.
Find the ]]></b:skin> in your blogger template code.
(Use CTRL+F and search for ]]></b:skin>)
Just above ]]></b:skin> Add the below CSS Code:
#trickstown-float {
position:fixed;position:absolute;bottom:0px; left:0px;
clip:inherit; top:expression(document.documentElement.scrollTop+
document.documentElement.clientHeight-this.clientHeight); left:expression(document.documentElement.scrollLeft+ document.documentElement.clientWidth - offsetWidth); }
Add HTML Code:
Now you have to place the HTML code for the widget that needs to float.
Place the widget code between the div tags as shown
<div id=”trickstown-float”> and </div>.
For Example the code looks like this.
<div id="trickstown-float">
Widget Code
</div>
You can make customizations for this floating widget as you like. Make changes such as the background, margins, 'bottom' with 'top' , and 'left' with 'right' and which ever the change you may want to make.
Please let me know if you have any doubts to clarify.
Thank you Labels: Blogger Plugins, blogger tips
Wednesday, November 20, 2013
Add awesome sticky footer menu to Blogger with simple HTML

Look at the image below to know how the sticky menu bar looks in your blog's footer.

You can also watch the live demo of this sticky menu bar here.
View LIVE DEMO
You may like to read:
How to earn money with your facebook pages?
How to add separate contact page to blogger?
How to add facebook like button below blogger posts?
Best practices to write titles for Search Engine Optimization(SEO)
Great tips to reduce loading time of your blog to increase more readers
Idiotic and funny ways you never know to promote your blog
How to earn money from blogs?
Add floating widget to your blogger blog
Get more viewers to your blog using facebook fan page
Now let me explain how to add this menu to your blog.
- Login to your Blogger account
- Go to Dashboard.
- Select Template>Edit HTML.
Search in your Template for the piece of code shown below.
| ]]></b:skin> |
After finding that code you need to follow this method.
Just above/before
| ]]></b:skin> |
CSS Part:
| #cmb-stickey_footer { /* This will make your footer stay where it is */ background: none repeat scroll 0 0 #1D1D1D; border: 1px solid rgba(0, 0, 0, 0.3); bottom: 0; font-family: Arial, Helvetica, sans-serif; height: 40px; left: 50%; margin: 0 auto 0 -490px; padding: 0 10px; position: fixed; text-shadow: 1px 1px 1px #000000; width: 960px; } /* border curves */ #cmb-stickey_footer { -moz-border-radius: 10px 10px 0px 0px; -webkit-border-radius: 10px 10px 0px 0px; border-radius: 10px 10px 0px 0px; } /* hover effect */ #cmb-stickey_footer:hover { background: none repeat scroll 0 0 #2b2a2a; } /* shadow for the footer*/ #cmb-stickey_footer { -moz-box-shadow:0px 0px 11px #191919; -webkit-box-shadow:0px 0px 11px #191919; box-shadow:0px 0px 11px #191919; } #cmb-footer_menu { margin: 0; padding: 0; width:auto; } #cmb-footer_menu li { list-style: none; float: left; font-size:12px; padding: 12px 14px 14px 14px; border-right:1px solid rgba(0, 0, 0, 0.4); background: rgba(0, 0, 0, 0.1); } #cmb-footer_menu .imgmenu { padding:5px 8px 3px 14px; float:left; background:url("https://blogger.googleusercontent.com/img/b/R29vZ2xl/AVvXsEghO0X6WnBFI1QNtiD61FGbQeM9V975K0lhC5o1abcLj5CH4YvuMVmnKr8WvUmuliEyiLVUWRZceLJt3o33s_ryWO3aV5M2i42HczQZXqBCrnlCvQt-Z42UyUSwWl80nJJbZNFEvADo5Jc/s1600/home.png") 13px 5px no-repeat; width:36px; height:30px; border:none; border-right:1px solid rgba(0, 0, 0, 0.4); cursor:pointer; } #cmb-footer_menu li:hover { background:#202020; /* Fallback color for old browsers */ background: rgba(0, 0, 0, 0.3); } #cmb-footer_menu .imgmenu:hover { background:url("https://blogger.googleusercontent.com/img/b/R29vZ2xl/AVvXsEiVEMyughNa1otwnTTmxwuyPKjZNV0QX58s9kEW3Uwh-zVXY3YeGKktAXMssBuVBvH9FauC3iJRAjNQDbvEFadx7Ixg8Z0JZu7oGkBBDlhPyGvw5NfdoitFp3o3cqEekNNhh1dYH9Ad1FI/s1600/home_hover.png") 13px 5px no-repeat; } #cmb-footer_menu li a { display: block; color: #cccccc; text-decoration: none; } #cmb-footer_menu li a:hover { color: #ffffff; } #cmb-footer_menu li span { display:none; } #cmb-stickey_footer #cmb-social_icons { float:right; /* social icons positions */ width:auto; margin:5px 15px 0px; padding:0px; overflow:hidden; } #cmb-stickey_footer #cmb-social_icons li { margin-right:12px; /* 12px is the space between each one of them */ float:left; width:24px; padding:0px; height:32px; list-style:none; _margin-right:0px; /* this is for IE6 only */ } |
Search for
| </body> |
| <div id='cmb-stickey_footer'> <ul id='cmb-footer_menu'> <!-- Begin Footer Menu --> <li class='imgmenu'><a href='#'><span>Home</span></a></li> <!-- This Item is an Image, the "span" is hidden via CSS --> <li><a href='#'>Blogger Tutorials</a></li> <li><a href='#'>Blogger Templates</a></li> <li><a href='#'>CSS tricks</a></li> <li><a href='#'>HTML tricks</a></li> <li><a href='#'>Click My Blog3 Tricks</a></li> <li><a href='#'>Contact</a></li> </ul> <!-- End Social Icons --> <ul id='cmb-social_icons'> <!-- Social Icons --> <!-- The span is the text appearing on hover, use the tooltip class in the link --> <li><a href='#'><img alt='' src='https://blogger.googleusercontent.com/img/b/R29vZ2xl/AVvXsEg3f0k0w2mA-qUae53pFudFIVHYKJb7trJ0-yi6vOoeboGeAN1_LO58wyGQFxf6cF_r6BmcNseL9ZWm3DWU1_wy0KBV4Ke3sxLmxOg0AaHjbii7hfnYPy57jSPxpsewve47tApQBqtLS-A/s1600/twitter.png'/><span>Twitter</span></a></li> <li><a href='#'><img alt='' src='https://blogger.googleusercontent.com/img/b/R29vZ2xl/AVvXsEjdQjWHOn1Xo194KnNyPM4473vfYp65x9vQiUIC6rQgQ3p4ow3O6lAl2U2fqKDWRttKHfDydKizvCExlAbQXO_WQY8mCHAodR6diHDECjO-OtrJbTMSBThNshK2O7H20aRE1C23AyzJ4MU/s1600/digg.png'/><span>Digg</span></a></li> <li><a href='#'><img alt='' src='https://blogger.googleusercontent.com/img/b/R29vZ2xl/AVvXsEiH3kCl_JCDWOxdM1HDV7KsxSxSqOaTYqLC2IpOapZ3nN7wV1tsGnHqB6L0dAlDjpczaTQEqjQXaGQNlVAocl2dgjugZhQuyCrdni1zMliLsyPz6xq9ThGo05SgeiinYYDxNfDvuO1o1mY/s1600/flickr.png'/><span>Flickr</span></a></li> <li><a href='#'><img alt='' src='https://blogger.googleusercontent.com/img/b/R29vZ2xl/AVvXsEi_8xAV2zGawGn0y2nu3e7QTutQOXLU-WmhD7iWVFQoR-UUSIvVtk1km4E-tFx8FuQmjqtGWZsAYtuURs09vixgWKtXRI2Gh_UUaP7UyZgUaK3yctt2SlHhXLV6B9gsTpb-xdbzrLWwFyE/s1600/facebook.png'/><span>Facebook</span></a></li> </ul> </div> |
If you have any doubts regarding this tutorial you can comment below. If you have any suggestions please suggest me. Thanks for reading this tutorial. Please share it with your friends if you liked it.
Get Mobile Tricks, Free Balance tricks and all Computer solutions click here Labels: Blogger Plugins, blogger tips
Subscribe to:
Posts (Atom)

